This is not the current version. View the latest documentation
If you’re looking to use Realm purely from Swift, you should consider using Realm Swift instead. Using both Realm Objective‑C and Realm Swift simultaneously is not supported.
Realm Objective‑C enables you to efficiently write your app’s model layer in a safe, persisted and fast way. Here’s what it looks like:
// Define your models like regular Objective‑C classes
@interface Dog : RLMObject
@property NSString *name;
@property NSInteger age;
@end
RLM_ARRAY_TYPE(Dog)
@interface Person : RLMObject
@property NSString             *name;
@property NSData               *picture;
@property RLMArray<Dog *><Dog> *dogs;
@end

// Use them like regular Objective‑C objects
Dog *mydog = [[Dog alloc] init];
mydog.name = @"Rex";
NSLog(@"Name of dog: %@", mydog.name);

// Persist your data easily
RLMRealm *realm = [RLMRealm defaultRealm];
[realm transactionWithBlock:^{
  [realm addObject:mydog];
}];

// Query it from any thread
dispatch_async(dispatch_queue_create("background", 0), ^{
  RLMResults<Dog *> *r = [Dog objectsWhere:@"age > 8"];
});
If you have an app that is presently using Core Data and have been considering switching to Realm, we recently published an article discussing how to go about doing this. Go check it out!
Getting Started
Download Realm Objective‑C or see the source on GitHub.
Prerequisites
- Apps using Realm can target: iOS 7 or later, OS X 10.9 or later & WatchKit.
- Xcode 6 or later required.
- Objective‑C, Swift 1.2 & Swift 2.0 are supported.
Installation
N.B.: Dynamic frameworks are not compatible with iOS 7. See “Static Framework” for iOS 7 support.
- Download the latest release of Realm and extract the zip.
- Go to your Xcode project’s “General” settings. Drag
Realm.frameworkfrom theios/dynamic/,watchosorosx/directory to the “Embedded Binaries” section. Make sure Copy items if needed is selected and click Finish. - In your unit test target’s “Build Settings”, add the parent path to
Realm.frameworkin the “Framework Search Paths” section. - If using Realm with Swift, drag the file at
Swift/RLMSupport.swiftinto the File Navigator of your Xcode project, checking the Copy items if needed checkbox. - If using Realm in an iOS project, create a new “Run Script Phase” in your app’s target’s “Build Phases” and paste the following snippet in the script text field:
bash "${BUILT_PRODUCTS_DIR}/${FRAMEWORKS_FOLDER_PATH}/Realm.framework/strip-frameworks.sh"This step is required to work around an App Store submission bug when archiving universal binaries.
- Install CocoaPods 0.37.1 or later.
- In your Podfile, add
pod 'Realm'to your app target andpod 'Realm/Headers'to your test target. - From the command line, run
pod install. - Use the
.xcworkspacefile generated by CocoaPods to work on your project!
- Install Carthage 0.7.5 or later.
- Add
github "realm/realm-cocoa"to your Cartfile. - Run
carthage update. - iOS: Drag
Realm.frameworkfrom theCarthage/Build/iOS/directory to the “Linked Frameworks and Libraries” section of your Xcode project’s “General” settings.
OS X: DragRealm.frameworkfrom theCarthage/Build/Mac/directory to the “Embedded Binaries” section of your Xcode project’s “General” settings.
watchOS: DragRealm.frameworkfrom theCarthage/Build/watchOS/directory to the “Embedded Binaries” section of your Xcode project’s “General” settings. -
iOS: On your application targets’ “Build Phases” settings tab, click the “+” icon and choose “New Run Script Phase”. Create a Run Script with the following contents:
/usr/local/bin/carthage copy-frameworksand add the paths to the frameworks you want to use under “Input Files”, e.g.:
$(SRCROOT)/Carthage/Build/iOS/Realm.frameworkThis script works around an App Store submission bug triggered by universal binaries.
- Download the latest release of Realm and extract the zip.
- Drag
Realm.frameworkfrom theios/static/directory to the File Navigator of your Xcode project. Make sure Copy items if needed is selected and click Finish. - Click on your project in the Xcode File Navigator. Select your app’s target and go to the Build Phases tab. Under Link Binary with Libraries click + and add libc++.dylib.
- If using Realm with Swift, drag the file at
Swift/RLMSupport.swiftinto the File Navigator of your Xcode project, checking the Copy items if needed checkbox.
tvOS
Although tvOS is in beta, we’re currently evaluating what Realm would look like on the platform. If you’d like to evaluate early builds of Realm for tvOS, for development purposes only, not suitable for production, see PR #2506 for details.
Realm Browser
We also provide a standalone Mac app named Realm Browser to read and edit .realm databases.
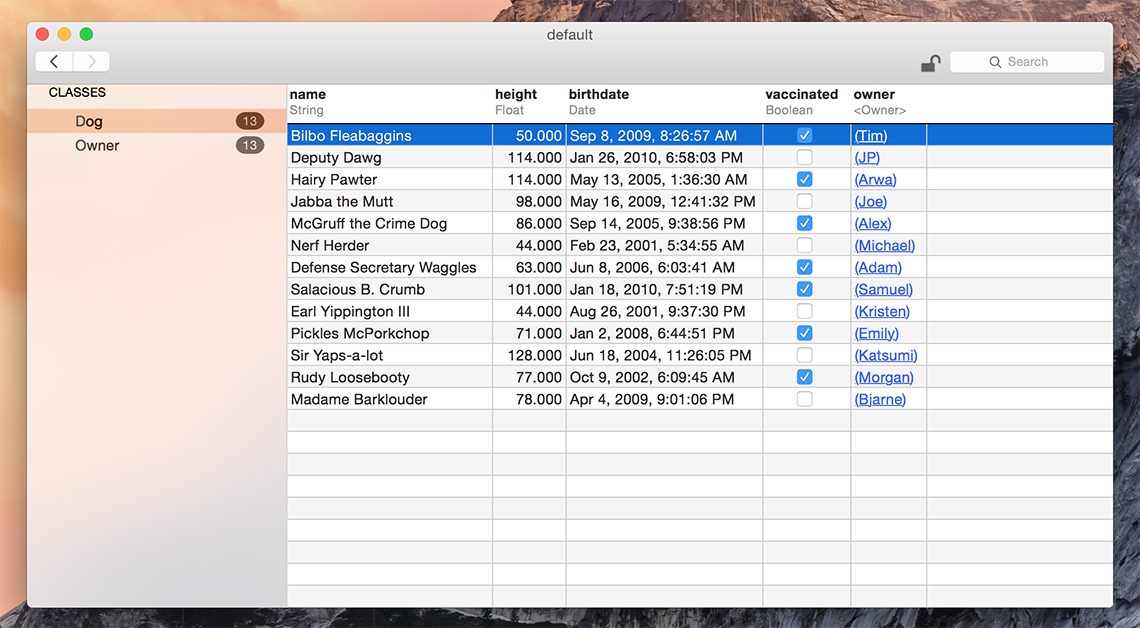
You can generate a test database with sample data using the menu item Tools > Generate demo database.
If you need help finding your app’s Realm file, check this StackOverflow answer for detailed instructions.
The Realm Browser is available on the Mac App Store.
Xcode Plugin
Our Xcode plugin makes it easy to generate new Realm models.
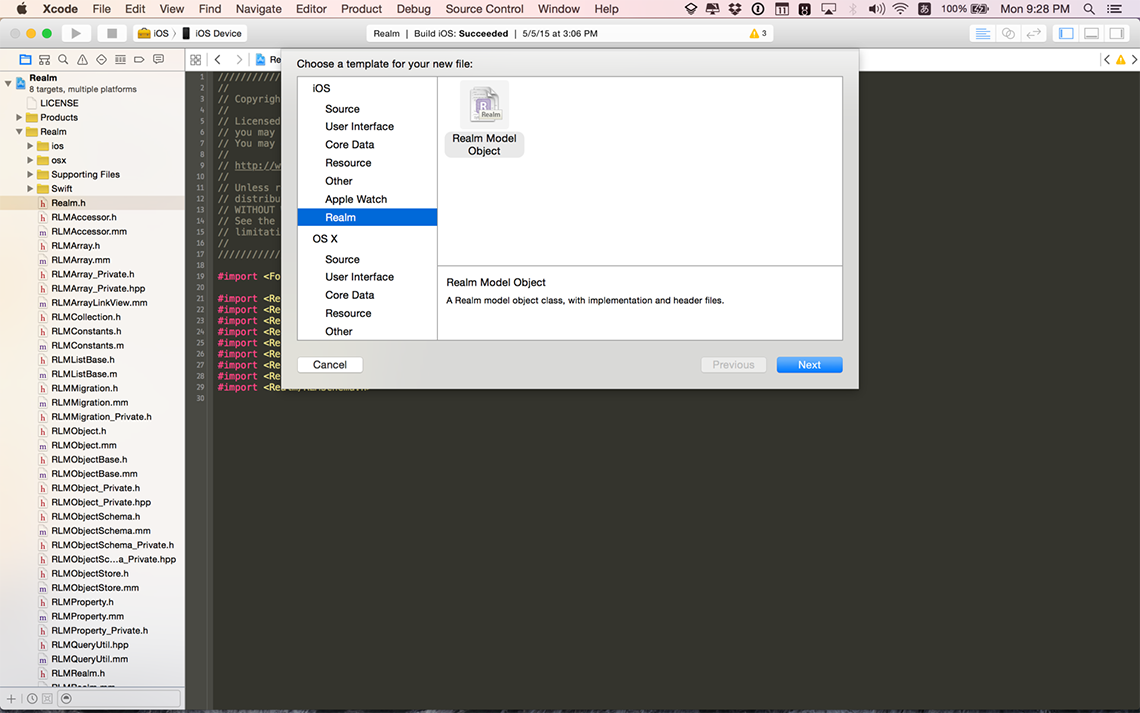
The easiest way to install the Realm Xcode plugin is through Alcatraz under the name “RealmPlugin”. You can also install the plugin manually by opening plugin/RealmPlugin.xcodeproj contained in the release zip and clicking build. You will need to quit and relaunch Xcode to see our plugin. If you use the Xcode menu to create a new file (File > New > File… — or ⌘N) you should see a new option to create a new Realm model.
API Reference
You can consult our full API reference for all classes, methods & more.
Examples
You can find example applications for both iOS and OS X in our release zip under examples/, demonstrating how to use many features of Realm like migrations, how to use it with UITableViewControllers, encryption, command-line tools and much more.
Getting Help
- Need help with your code? Ask on StackOverflow. We actively monitor & answer questions on SO!
- Have a bug to report? Open an issue on our repo. If possible, include the version of Realm, a full log, the Realm file, and a project that shows the issue.
- Have a feature request? Open an issue on our repo. Tell us what the feature should do, and why you want the feature.
Models
Realm data models are defined using traditional Objective‑C classes with properties. Simply subclass RLMObject or an existing model class to create your Realm data model objects. Realm model objects mostly function like any other Objective‑C objects - you can add your own methods and protocols to them and use them like you would any other object. The main restrictions are that you can only use an object on the thread which it was created, and you can’t access its ivars directly for any persisted properties.
If you have installed our Xcode Plugin there will be a nice template to create the interface and implementation files in the “New File…” dialog.
Relationships and nested data structures are modeled simply by including properties of the target type or RLMArrays for typed lists of objects.
#import <Realm/Realm.h>

@class Person;

// Dog model
@interface Dog : RLMObject
@property NSString *name;
@property Person   *owner;
@end
RLM_ARRAY_TYPE(Dog) // define RLMArray<Dog>

// Person model
@interface Person : RLMObject
@property NSString             *name;
@property NSDate               *birthdate;
@property RLMArray<Dog *><Dog> *dogs;
@end
RLM_ARRAY_TYPE(Person) // define RLMArray<Person>

// Implementations
@implementation Dog
@end // none needed

@implementation Person
@end // none needed
Since Realm parses all models defined in your code at launch, they must all be valid, even if they are never used.
See RLMObject for more details.
Supported Types
Realm supports the following property types: BOOL, bool, int, NSInteger, long, long long, float, double, NSString, NSDate truncated to the second, and NSData.
CGFloat properties are discouraged, as the type is not platform independent.
You can use RLMArray<Object *><Object> and RLMObject subclasses to model relationships such as to-many and to-one.
RLMArrays support compile-time Objective‑C generics if available (Xcode 7 or later). Here’s what the different components of the property definition mean and why they are useful:
RLMArray: The property type.<Object *>: The generic specialization. This helps prevent using the array with the wrong object type at compile-time.<Object>: The protocol thisRLMArrayconforms to. This enables Realm to know how to specialize the schema of this model at runtime.
Relationships
RLMObjects can be linked to each other by using RLMObject and RLMArray properties. RLMArrays have an interface very similar to NSArray and objects contained in a RLMArray can be accessed using indexed subscripting. Unlike NSArrays, RLMArrays are typed and only hold RLMObjects of a single subclass type. For more details see RLMArray.
Assuming your Person model has already been defined (see above) let’s create another model called Dog:
// Dog.h
@interface Dog : RLMObject
@property NSString *name;
@end
To-One Relationships
For many-to-one or one-to-one relationships, simply declare a property with the type of your RLMObject subclass:
// Dog.h
@interface Dog : RLMObject
// ... other property declarations
@property Person *owner;
@end
You can use this property like you would any other:
Person *jim = [[Person alloc] init];
Dog    *rex = [[Dog alloc] init];
rex.owner = jim;
When using RLMObject properties, you can access nested properties using normal property syntax. For example rex.owner.address.country will traverse the object graph and automatically fetch each object from Realm as needed.
To-Many Relationships
You can define a to-many relationship using RLMArray properties. RLMArrays contain other RLMObjects of a single type and have an interface very similar to NSMutableArray.
To add a “dogs” property on our Person model that links to multiple dogs, we must first define an RLMArray<Dog> type. This is done via a macro at the bottom of the corresponding model interface:
//Dog.h
@interface Dog : RLMObject
... // property declarations
@end

RLM_ARRAY_TYPE(Dog) // Defines an RLMArray<Dog> type
You can then declare properties of the RLMArray<Dog> type:
// Person.h
@interface Person : RLMObject
// ... other property declarations
@property RLMArray<Dog *><Dog> *dogs;
@end
You can access and assign RLMArray properties as usual:
// Jim is owner of Rex and all dogs named "Fido"
RLMResults<Dog> *someDogs = [Dog objectsWhere:@"name contains 'Fido'"];
[jim.dogs addObjects:someDogs];
[jim.dogs addObject:rex];
Inverse Relationships
With inverse relationships (also known as backlinks), you can obtain all objects linking to a given object through a specific property. For example, calling -linkingObjectsOfClass:forProperty: on a Dog instance will return all objects of the specified class linking to the calling instance with the specified property. It’s possible to simplify this pattern by defining a read-only (computed) owners property on Dog:
@interface Dog : RLMObject
@property NSString *name;
@property NSInteger age;
@property (readonly) NSArray *owners; // Realm doesn't persist this property because it is readonly
@end

@implementation Dog
// Define "owners" as the inverse relationship to Person.dogs
- (NSArray *)owners {
    return [self linkingObjectsOfClass:@"Person" forProperty:@"dogs"];
}
@end
Property Attributes
Note that Realm ignores Objective‑C property attributes like nonatomic, atomic, strong, copy, weak, etc. This is done because Realm has its own optimized storage semantics under the hood. So to avoid being misleading, we recommend writing models without any property attributes at all. However, if you do set property attributes, they will be used until an RLMObject is added to a realm. Custom names for getters and setters work normally regardless of whether or not an RLMObject is in a realm.
Indexed Properties
Override +indexedProperties to set which properties in your model should be indexed:
@interface Book : RLMObject
@property float price;
@property NSString *title;
@end

@implementation Book
+ (NSArray *)indexedProperties {
  return @[@"title"];
}
@end
Default Property Values
Override +defaultPropertyValues to provide default values every time an object is created. Since Swift already provides a way to define default property values inline with the property definitions, you should use that approach instead of defaultPropertyValues().
@interface Book : RLMObject
@property float price;
@property NSString *title;
@end

@implementation Book
+ (NSDictionary *)defaultPropertyValues {
    return @{@"price" : @0, @"title": @""};
}
@end
Primary Keys
Override +primaryKey to set the model’s primary key. Declaring a primary key allows objects to be looked up and updated efficiently and enforces uniqueness for each value. Once an object with a primary key is added to a Realm, the primary key cannot be changed.
@interface Person : RLMObject
@property NSInteger id;
@property NSString *name;
@end

@implementation Person
+ (NSString *)primaryKey {
    return @"id";
}
@end
Ignored Properties
Override ignoredProperties to prevent Realm from persisting model properties. Realm won’t interfere with the regular operation of these properties: they’ll be backed by ivars and you can freely override their setters and getters.
@interface Person : RLMObject
@property NSInteger tmpID;
@property (readonly) NSString *name; // read-only properties are automatically ignored
@property NSString *firstName;
@property NSString *lastName;
@end

@implementation Person
+ (NSArray *)ignoredProperties {
    return @[@"tmpID"];
}
- (NSString *)name {
    return [NSString stringWithFormat:@"%@ %@", self.firstName, self.lastName];
}
@end
Writes
All changes to an object (addition, modification and deletion) must be done within a write transaction.
Realm objects can be instantiated and used as standalone just like regular Objective‑C objects. To share objects between threads or re-use them between app launches you must persist them to a Realm, an operation which must be done within a write transaction.
Creating Objects
When you have defined a model you can instantiate your RLMObject subclass and add the new instance to the Realm. Consider this simple model:
// Dog model
@interface Dog : RLMObject

@property NSString *name;
@property NSInteger age;

@end

// Implementation
@implementation Dog
@end
We can create new objects in several ways:
// (1) Create a Dog object and then set its properties
Dog *myDog = [[Dog alloc] init];
myDog.name = @"Rex";
myDog.age = 10;

// (2) Create a Dog object from a dictionary
Dog *myOtherDog = [[Dog alloc] initWithValue:@{@"name" : @"Pluto", @"age" : @3}];

// (3) Create a Dog object from an array
Dog *myThirdDog = [[Dog alloc] initWithValue:@[@"Pluto", @3]];- The most obvious is to use alloc-init (in Objective‑C) or the designated initializer (in Swift) to create an object. Please note that all properties must be set before an object can be added to the Realm.
- Objects can also be created from dictionaries using appropriate keys and values.
- Finally RLMObject subclasses can be instantiated using arrays. The values in the array have to be in the same order as the corresponding properties in the model.
Nested Objects
If an object has properties that are RLMObjects or RLMArrays, these can be set recursively using nested arrays and/or dictionaries. You simply replace each object with a dictionary or array representing its properties:
// Instead of using already existing dogs...
Person *aPerson = [[Person alloc] initWithValue:@[@"Jane", @30, @[aDog, anotherDog]]];

// ...we can create them inline
Person *aPerson = [[Person alloc] initWithValue:@[@"Jane", @30, @[@[@"Buster", @5],
                                                                 @[@"Buddy", @6]]]];
This will work for any combination of nested arrays and dictionaries. Note that an RLMArray may only contain RLMObjects, not basic types such as NSString.
Adding Objects
You can add an object to a Realm like so:
// Create object
Person *author = [[Person alloc] init];
author.name    = @"David Foster Wallace";

// Get the default Realm
RLMRealm *realm = [RLMRealm defaultRealm];
// You only need to do this once (per thread)

// Add to Realm with transaction
[realm beginWriteTransaction];
[realm addObject:author];
[realm commitWriteTransaction];
After you have added the object to the Realm you can continue using it, and all changes you make to it will be persisted (and must be made within a write transaction). Any changes are made available to other threads that use the same Realm when the write transaction is committed.
Please note that writes block each other, and will block the thread they are made on if multiple writes are in progress. This is similar to other persistence solutions and we recommend that you use the usual best-practices for this situation, namely offloading your writes to a separate thread.
Due to Realm’s MVCC architecture, reads are not blocked while a write transaction is open. Unless you need to make simultaneous writes from many threads at once, you should favor larger write transactions that do more work over many fine-grained write transactions.
See RLMRealm and RLMObject for more details.
Updating Objects
Realm a few ways to update objects, all of which offer different tradeoffs depending on the situation. Choose which one is best for your situation:
Typed Updates
You can update any object by setting its properties within a write transaction.
// Update an object with a transaction
[realm beginWriteTransaction];
author.name = @"Thomas Pynchon";
[realm commitWriteTransaction];
Updating Objects With Primary Keys
If you have a primary key on your model, you can update an object or insert a new one if it doesn’t exist yet using +[RLMObject createOrUpdateInRealm:withValue:].
// Creating a book with the same primary key as a previously saved book
Book *cheeseBook = [[Book alloc] init];
cheeseBook.title = @"Cheese recipes";
cheeseBook.price = @9000;
cheeseBook.id = @1;

// Updating book with id = 1
[realm beginWriteTransaction];
[Book createOrUpdateInRealm:realm withValue:cheeseBook];
[realm commitWriteTransaction];
If a book with a primary key id of 1 was not in the database, this would create a new book instead.
You can also partially update objects with primary keys by passing the subset of values you wish to update, along with the primary key:
// Assuming a "Book" with a primary key of `1` already exists.
[realm beginWriteTransaction];
[Book createOrUpdateInRealm:realm withValue:@{@"id": @1, @"price": @9000.0f}];
// the book's `title` property will remain unchanged.
[realm commitWriteTransaction];
Key-Value Coding
RLMObject, RLMResult, and RLMArray all conform to key-value coding (KVC). This can be useful when you need to determine which property to update at runtime.
Applying KVC to a collection is a great way to update objects in bulk without the overhead of iterating over a collection while creating accessors for every item.
RLMResults *persons = [Person allObjects];
[[RLMRealm defaultRealm] transactionWithBlock:^{
  [[persons firstObject] setValue:@YES forKeyPath:@"isFirst"];
  // set each person's planet property to "Earth"
  [persons setValue:@"Earth" forKeyPath:@"planet"];
}];
Deleting Objects
Pass the object to be deleted to the -[RLMRealm deleteObject:] method within a write transaction.
Book *cheeseBook = ... // Book stored in Realm

// Delete an object with a transaction
[realm beginWriteTransaction];
[realm deleteObject:cheeseBook];
[realm commitWriteTransaction];
You can also delete all objects stored in a Realm. Note the Realm file will maintain its size on disk to efficiently reuse that space for future objects.
// Delete all objects from the realm
[realm beginWriteTransaction];
[realm deleteAllObjects];
[realm commitWriteTransaction];
Queries
Queries return an RLMResults instance, which contains a collection of RLMObjects. RLMResults have an interface very similar to NSArray and objects contained in a RLMResults can be accessed using indexed subscripting. Unlike NSArrays, RLMResults are typed and only hold RLMObjects of a single subclass type.
All queries (including queries and property access) are lazy in Realm. Data is only read when the properties are accessed.
Results to a query are not copies of your data: modifying the results of a query (within a write transaction) will modify the data on disk directly. Similarly, you can traverse your graph of relationships directly from the RLMObjects contained in a RLMResults.
The most basic method for retrieving objects from a Realm is +[RLMObject allObjects], which returns a RLMResults of all RLMObject instances of the subclass type being queried the default Realm.
RLMResults<Dog *> *dogs = [Dog allObjects]; // retrieves all Dogs from the default Realm
Filtering
If you’re familiar with NSPredicate, then you already know how to query in Realm. RLMObjects, RLMRealm, RLMArray, and RLMResults all provide methods that allow you to query for specific RLMObject instances by simply passing in an NSPredicate instance, predicate string, or predicate format string just as you would when querying an NSArray.
For example, the following would extend our earlier example by calling [RLMObject objectsWhere:] to retrieve all dogs with the color tan and names beginning with ‘B’ from the default Realm:
// Query using a predicate string
RLMResults *tanDogs = [Dog objectsWhere:@"color = 'tan' AND name BEGINSWITH 'B'"];

// Query using an NSPredicate
NSPredicate *pred = [NSPredicate predicateWithFormat:@"color = %@ AND name BEGINSWITH %@",
                                                     @"tan", @"B"];
tanDogs = [Dog objectsWithPredicate:pred];
See Apple’s Predicates Programming Guide for more information about building predicates and use our NSPredicate Cheatsheet. Realm supports many common predicates:
- The comparison operands can be property names or constants. At least one of the operands must be a property name.
- The comparison operators ==, <=, <, >=, >, !=, and BETWEEN are supported for int, long, long long, float, double, and NSDate property types. Such as age == 45
- Identity comparisons ==, !=, e.g. [Employee objectsWhere:@”company == %@”, company]
- The comparison operators == and != are supported for boolean properties.
- For NSString and NSData properties, we support the ==, !=, BEGINSWITH, CONTAINS, and ENDSWITH operators, such as name CONTAINS ‘Ja’
- Case insensitive comparisons for strings, such as name CONTAINS[c] ‘Ja’. Note that only characters “A-Z” and “a-z” will be ignored for case.
- Realm supports the following compound operators: “AND”, “OR”, and “NOT”. Such as name BEGINSWITH ‘J’ AND age >= 32
- The containment operand IN such as name IN {‘Lisa’, ‘Spike’, ‘Hachi’}
- Nil comparisons ==, !=, e.g.
[Company objectsWhere:@"ceo == nil"]. Note this only works for objects with relationships, for example here, ceo is a property on the Company model. - ANY comparisons, such as ANY student.age < 21
- Note, although there’s no support for the aggregate expression type, we do support the BETWEEN operator type using object values, e.g.
[Person objectsWhere:@"age BETWEEN %@", @[42, 43]].
For more, see [RLMObject objectsWhere:].
Sorting
RLMResults allows you to specify a sort criteria and order based on a single or multiple properties. For example, the following calls sorts the returned dogs from the example above alphabetically by name:
// Sort tan dogs with names starting with "B" by name
RLMResults *sortedDogs = [[Dog objectsWhere:@"color = 'tan' AND name BEGINSWITH 'B'"]
                               sortedResultsUsingProperty:@"name" ascending:YES];
For more, see [RLMObject objectsWhere:] and [RLMResults sortedResultsUsingProperty:ascending:].
Chaining
One unique property of Realm’s query engine is the ability to chain queries with very little transactional overhead when compared to traditional databases that require a separate trip to the database server for each successive query.
For example, if we wanted a result set for just the tan colored dogs, and the tan colored dogs whose names also started with ‘B’, you might chain two queries like this:
RLMResults *tanDogs = [Dog objectsWhere:@"color = 'tan'"];
RLMResults *tanDogsWithBNames = [tanDogs objectsWhere:@"name BEGINSWITH 'B'"];
Realms
The Default Realm
You may have noticed so far that we have initialized access to our realm variable by calling [RLMRealm defaultRealm]. That method returns an RLMRealm object that maps to a file called “default.realm” under the Documents folder of your app.
Many methods in Realm’s API have both a version that accepts an RLMRealm instance, and a convenience version that uses the default realm. For example, [RLMObject allObjects] is equivalent to [RLMObject allObjectsInRealm:[RLMRealm defaultRealm]].
Realm Configuration
Configuring things like where your Realm files are stored is done through RLMRealmConfiguration. The configuration can either be passed to [RLMRealm realmWithConfiguration:config error:&err] each time you need a Realm instance, or you can set the configuration to use for the default Realm with [RLMRealmConfiguration setDefaultConfiguration:config].
For example, suppose you have an application where users have to log in to your web backend, and you want to support quickly switching between accounts. You could give each account its own Realm file that will be used as the default Realm by doing the following:
+ (void)setDefaultRealmForUser:(NSString *)username {
  RLMRealmConfiguration *config = [RLMRealmConfiguration defaultConfiguration];

  // Use the default directory, but replace the filename with the username
  config.path = [[[config.path stringByDeletingLastPathComponent]
                   stringByAppendingPathComponent:username]
                   stringByAppendingPathExtension:@"realm"];

  // Set this as the configuration used for the default Realm
  [RLMRealmConfiguration setDefaultConfiguration:config];
}
Other Realms
It’s sometimes useful to have multiple Realms persisted at different locations. For example, you may want to bundle some data with your application in a Realm file, in addition to your main Realm. You can do this with the following code:
RLMRealmConfiguration *config = [RLMRealmConfiguration defaultConfiguration];

// Get the path to the bundled file
config.path = [[NSBundle mainBundle] pathForResource:@"MyBundledData" ofType:@"realm"];
// Open the file in read-only mode as application bundles are not writeable
config.readOnly = YES;

// Open the Realm with the configuration
RLMRealm *realm = [RLMRealm realmWithConfiguration:config];

// Read some data from the bundled Realm
RLMResults<Dog *> *dogs = [Dog objectsInRealm:realm where:@"age > 5"];
Please note that if a custom path is used to initialize a Realm, it must be in a location with write permissions. The most common location to store writable Realm files is the “Documents” directory on iOS and the “Application Support” directory on OS X. Please respect Apple’s iOS Data Storage Guidelines, which recommend that documents that can be regenerated be stored in the <Application_Home>/Library/Caches directory.
In-Memory Realms
Normally Realms are persisted to disk, but you can also create ones which operate purely in memory by setting the inMemoryIdentifier rather than the path on your RLMRealmConfiguration.
RLMRealmConfiguration *config = [RLMRealmConfiguration defaultConfiguration];
config.inMemoryIdentifier = @"MyInMemoryRealm";
RLMRealm *realm = [RLMRealm realmWithConfiguration:config];
In-memory Realms do not save data across app launches, but all other features of Realm will work as expected, including querying, relationships and thread-safety. This is a useful option if you need flexible data access without the overhead of disk persistence.
In-memory Realms create several files in a temporary directory for coordinating things like cross-process notifications. No data is actually written to the files unless the operating system needs to swap to disk due to memory pressure.
Notice: When all in-memory Realm instances with a particular identifier go out of scope with no references, all data is freed for that Realm. It is recommended that you hold onto a strong reference to any created in-memory Realms for the duration of your app.
Copying Objects Between Realms
Copying Realm objects to other Realms is as simple as passing in the original object to +[RLMObject createInRealm:withValue:]. For example, [MyRLMObjectSubclass createInRealm:otherRealm withValue:originalObjectInstance]. Remember that Realm objects can only be accessed from the thread on which they were first created, so this copy will only work for Realms on the same thread.
Finding a Realm File
If you need help finding your app’s Realm file, check this StackOverflow answer for detailed instructions.
Bundling a Realm with an App
It’s common to seed an app with initial data, making it available to your users immediately on first launch. Here’s how to do this:
- First, populate the realm. You should use the same data model as your final, shipping app to create a realm and populate it with the data you wish to bundle with your app. Since realm files are cross-platform, you can use an OS X app (see our JSONImport example) or your iOS app running in the simulator.
- In the code where you’re generating this realm file, you should finish by making a compacted copy of the file (see
-[RLMRealm writeCopyToPath:error:]). This will reduce the Realm’s file size, making your final app lighter to download for your users. - Drag the new compacted copy of your realm file to your final app’s Xcode Project Navigator.
- Go to your app target’s build phases tab in Xcode and add the realm file to the “Copy Bundle Resources” build phase.
- At this point, your bundled realm file will be accessible to your app. You can find its path by using
[[NSBundle mainBundle] pathForResource:ofType:]. - If the bundled Realm contains fixed data that you don’t need to modify, you can open it directly from the bundle path by setting
readOnly = trueon the RLMRealmConfiguration object. Otherwise, if it’s initial data that you’ll be modifying, you can copy the bundled file to your application’s Documents directory using[[NSFileManager defaultManager] copyItemAtPath:toPath:error:].
You can refer to our migration sample app for an example of how to use a bundled realm file.
Class Subsets
In some scenarios you may wish to limit which classes can be stored in a specific Realm. For example, if you have two teams working on different components of your application which both use Realm internally, you may not want to have to coordinate migrations between them. You can do this by setting the objectClasses property of your RLMRealmConfiguration:
RLMRealmConfiguration *config = [RLMRealmConfiguration defaultConfiguration];
config.objectClasses = @[MyClass.class, MyOtherClass.class];
RLMRealm *realm = [RLMRealm realmWithConfiguration:config];
Threading
Within individual threads you can just treat everything as regular objects without worrying about concurrency or multithreading. There is no need for any locks or resource coordination to access them (even if they are simultaneously being modified on other threads) and it is only modifying operations that have to be wrapped in write transactions.
Realm makes concurrent usage easy by ensuring that each thread always has a consistent view of the Realm. You can have any number of threads working on the same Realms in parallel, and since they all have their own snapshots, they will never cause each other to see inconsistent state.
The only thing you have to be aware of is that you cannot have multiple threads sharing the same instances of Realm objects. If multiple threads need to access the same objects they will each need to get their own instances (otherwise changes happening on one thread could cause other threads to see incomplete or inconsistent data).
Seeing Changes From Other Threads
On the main UI thread (or any thread with a runloop) objects will automatically update with changes from other threads between each iteration of the runloop. At any other time you will be working on the snapshot, so individual methods always see a consistent view and never have to worry about what happens on other threads.
When you initially open a Realm, its state will be based off the most recent successful write commit, and it will remain on that version until refreshed. Realms are automatically refreshed at the start of every runloop iteration, unless RLMRealm’s autorefresh property is set to NO. If a thread has no runloop (which is generally the case in a background thread), then -[RLMRealm refresh] must be called manually in order to advance the transaction to the most recent state.
Realms are also refreshed when write transactions are committed (-[RLMRealm commitWriteTransaction]).
Failing to refresh Realms on a regular basis could lead to some transaction versions becoming “pinned”, preventing Realm from reusing the disk space used by that version, leading to larger file sizes. Refer to our Current Limitations for more details on this effect.
Passing Instances Across Threads
Standalone (unpersisted) instances of RLMObjects behave exactly as regular NSObject subclasses, and are safe to pass across threads.
Persisted instances of RLMRealm, RLMObject, RLMResults, or RLMArray can only be used on the thread on which they were created, otherwise an exception is thrown*. This is one way Realm enforces transaction version isolation. Otherwise, it would be impossible to determine what should be done when an object is passed between threads at different transaction versions, with a potentially extensive relationship graph.
Instead, there are several ways to represent instances in ways that can be safely passed between threads. For example, an object with a primary key can be represented by its primary key’s value; or an RLMResults can be represented by its NSPredicate or query string; or an RLMRealm can be represented by its RLMRealmConfiguration. The target thread can then re-fetch the RLMRealm, RLMObject, RLMResults, or RLMArray using its thread-safe representation. Keep in mind that re-fetching will retrieve an instance at the version of the target thread, which may differ from the originating thread.
* Some properties and methods on these types can be accessed from any thread:
- RLMRealm: all properties, class methods, and initializers.
- RLMObject:
invalidated,objectSchema,realm, class methods, and initializers. - RLMResults:
objectClassNameandrealm. - RLMArray:
invalidated,objectClassName, andrealm.
Using a Realm Across Threads
To access the same Realm file from different threads, you must initialize a new Realm to get a different instance for every thread of your app. As long as you specify the same configuration, all Realm instances will map to the same file on disk.
Sharing Realm instances across threads is not supported.
Realm instances accessing the same realm file must also all use the same RLMRealmConfiguration.
Realm can be very efficient when writing large amounts of data by batching together multiple writes within a single transaction. Transactions can also be performed in the background using Grand Central Dispatch to avoid blocking the main thread. RLMRealm objects are not thread safe and cannot be shared across threads, so you must get a Realm instance in each thread/dispatch_queue in which you want to read or write. Here’s an example of inserting a million objects in a background queue:
dispatch_async(queue, ^{
  @autoreleasepool {
    // Get realm and table instances for this thread
    RLMRealm *realm = [RLMRealm defaultRealm];

    // Break up the writing blocks into smaller portions
    // by starting a new transaction
    for (NSInteger idx1 = 0; idx1 < 1000; idx1++) {
      [realm beginWriteTransaction];

      // Add row via dictionary. Property order is ignored.
      for (NSInteger idx2 = 0; idx2 < 1000; idx2++) {
        [Person createInRealm:realm
                    withValue:@{@"name"      : [self randomString],
                                @"birthdate" : [self randomDate]}];
      }

      // Commit the write transaction
      // to make this data available to other threads
      [realm commitWriteTransaction];
    }
  }
});
Notifications
Realm instances send out notifications to other instances on other threads every time a write transaction is committed. These notifications can be observed by registering a block:
// Observe Realm Notifications
self.token = [realm addNotificationBlock:^(NSString *note, RLMRealm * realm) {
    [myViewController updateUI];
}];
The notification stays active as long as a reference is held to the returned notification token. You should hold onto a strong reference to this token on the class registering for updates, as notifications are automatically un-registered when the notification token is deallocated.
See [RLMRealm addNotificationBlock:] and [RLMRealm removeNotificationBlock:] for details.
Migrations
When working with any database, it is likely your data model will change over time. Since data models in Realm are defined as standard Objective‑C classes, making model changes is as easy as changing any other Objective‑C class. For example, suppose we have the following Person model:
@interface Person : RLMObject
@property NSString *firstName;
@property NSString *lastName;
@property int age;
@end
We want to update the data model to require a fullName property, rather than separate first and last names. To do this, we simply change the object interface to the following:
@interface Person : RLMObject
@property NSString *fullName;
@property int age;
@end
At this point if you had saved any data with the previous model version, there will be a mismatch between what Realm sees defined in code and the data Realm sees on disk. When this occurs, an exception will be thrown when you try to open the existing file unless you run a migration.
Performing a Migration
You define a migration and the associated schema version by setting RLMRealmConfiguration.schemaVersion and RLMRealmConfiguration.migrationBlock. Your migration block provides all the logic for converting data models from previous schemas to the new schema. When creating a RLMRealm with this configuration, the migration block will be applied to update the RLMRealm to the given schema version if a migration is needed.
For example, suppose we want to migrate the Person model declared earlier. The minimal necessary migration block would be the following:
// Inside your [AppDelegate didFinishLaunchingWithOptions:]

RLMRealmConfiguration *config = [RLMRealmConfiguration defaultConfiguration];
// Set the new schema version. This must be greater than the previously used
// version (if you've never set a schema version before, the version is 0).
config.schemaVersion = 1;

// Set the block which will be called automatically when opening a Realm with a
// schema version lower than the one set above
config.migrationBlock = ^(RLMMigration *migration, uint64_t oldSchemaVersion) {
  // We haven’t migrated anything yet, so oldSchemaVersion == 0
  if (oldSchemaVersion < 1) {
    // Nothing to do!
    // Realm will automatically detect new properties and removed properties
    // And will update the schema on disk automatically
  }
};

// Tell Realm to use this new configuration object for the default Realm
[RLMRealmConfiguration setDefaultConfiguration:config];

// Now that we've told Realm how to handle the schema change, opening the file
// will automatically perform the migration
[RLMRealm defaultRealm];
At the very minimum all we need to do is to update the version with an empty block to indicate the that the schema has been upgraded (automatically) by Realm.
While this is the minimum acceptable migration, we probably want to use this block to populate any new properties (in this case fullName) with something meaningful. Within the migration block we can call [RLMMigration enumerateObjects:block:] to enumerate each RLMObject of a certain type, and apply any necessary migration logic. Notice how for each enumeration the existing RLMObject instance is accessed via an oldObject variable and the updated instance is accessed via newObject:
// Inside your [AppDelegate didFinishLaunchingWithOptions:]

RLMRealmConfiguration *config = [RLMRealmConfiguration defaultConfiguration];
config.schemaVersion = 1;
config.migrationBlock = ^(RLMMigration *migration, uint64_t oldSchemaVersion) {
  // We haven’t migrated anything yet, so oldSchemaVersion == 0
  if (oldSchemaVersion < 1) {
    // The enumerateObjects:block: method iterates
    // over every 'Person' object stored in the Realm file
    [migration enumerateObjects:Person.className
                          block:^(RLMObject *oldObject, RLMObject *newObject) {

      // combine name fields into a single field
      newObject[@"fullName"] = [NSString stringWithFormat:@"%@ %@",
                                         oldObject[@"firstName"],
                                         oldObject[@"lastName"]];
    }];
  }
};
[RLMRealmConfiguration setDefaultConfiguration:config];
Once the migration is successfully completed, the Realm and all of its objects can be accessed as usual by your app.
Adding more versions
Suppose now we have two previous versions of the Person class:
// v0
@interface Person : RLMObject
@property NSString *firstName;
@property NSString *lastName;
@property int age;
@end

// v1
@interface Person : RLMObject
@property NSString *fullName; // new property
@property int age;
@end

// v2
@interface Person : RLMObject
@property NSString *fullName;
@property NSString *email;   // new property
@property int age;
@end
The logic in our migration block might look like the following:
RLMRealmConfiguration *config = [RLMRealmConfiguration defaultConfiguration];
config.schemaVersion = 2;
config.migrationBlock = ^(RLMMigration *migration, uint64_t oldSchemaVersion) {
  // The enumerateObjects:block: method iterates
  // over every 'Person' object stored in the Realm file
  [migration enumerateObjects:Person.className
                        block:^(RLMObject *oldObject, RLMObject *newObject) {
    // Add the 'fullName' property only to Realms with a schema version of 0
    if (oldSchemaVersion < 1) {
      newObject[@"fullName"] = [NSString stringWithFormat:@"%@ %@",
                                oldObject[@"firstName"],
                                oldObject[@"lastName"]];
    }

    // Add the 'email' property to Realms with a schema version of 0 or 1
    if (oldSchemaVersion < 2) {
      newObject[@"email"] = @"";
    }
  }];
};
[RLMRealmConfiguration setDefaultConfiguration:config];

// now that we have updated the schema version and provided a migration block,
// opening an outdated Realm will automatically perform the migration and
// opening the Realm will succeed
[RLMRealm defaultRealm];
For a more complete look at the implementation of a data schema migration, check out our migration sample app.
Linear Migrations
Suppose we have two users for our app: JP and Tim. JP updates the app very often, but Tim happens to skip a few versions. It’s likely that JP has seen every new version of our app, and every schema upgrade in sequence: he downloaded a version of the app that took him from v0 to v1, another update that took him from v1 to v2. In contrast, it’s possible that Tim will download an update of the app that would need to take him from v0 to v2 immediately. Structuring your migration blocks with non-nested if (oldSchemaVersion < X) calls ensures that they will see all necessary upgrades, no matter which schema version they start from.
Another scenario may arise in the case of users who skipped versions of your app. If you delete a property email at version 2 and re-introduce it at version 3, and a user jumps from version 1 to version 3, Realm will not be able to automatically detect the deletion of the email property, as there will be no mismatch between the schema on disk and the schema in the code for that property. This will lead to Tim’s Person object having a v3 address property that has the contents of the v1 address property. This may not be a problem, unless you changed the internal storage representation of that property between v1 and v3 (say, went from an ISO address representation to a custom one). To avoid this, we recommend you nil out the email property on the if (oldSchemaVersion < 3) statement, guaranteeing that all realms upgraded to version 3 will have a correct dataset.
Encryption
Realm’s encryption APIs are available for iOS, OS X & WatchKit but not watchOS because the <mach/mach.h> and <mach/exc.h> APIs used by Realm’s encryption mechanism are marked as __WATCHOS_PROHIBITED.
We’ve filed a radar about this issue: rdar://22063654.
Please take note of the Export Compliance section of our LICENSE, as it places restrictions against the usage of Realm if you are located in countries with an export restriction or embargo from the United States.
On iOS, it’s possible to encrypt Realm files with very little performance overhead by using NSFileProtection APIs. There are two main caveats to this approach: 1) the Realm file won’t be portable to other platforms (NSFileProtection is iOS-only) and 2) the Realm file won’t be encrypted on iOS devices that aren’t password-protected. To avoid these restrictions (or if you’re building an OS X app), then you should use Realm-level encryption.
Realm supports encrypting the database file on disk with AES-256+SHA2 by supplying a 64-byte encryption key when creating a Realm.
// Generate a random encryption key
NSMutableData *key = [NSMutableData dataWithLength:64];
SecRandomCopyBytes(kSecRandomDefault, key.length, (uint8_t *)key.mutableBytes);

// Open the encrypted Realm file
RLMRealmConfiguration *config = [RLMRealm defaultConfiguration];
config.encryptionKey = key;
NSError *error;
RLMRealm *realm = [RLMRealm realmWithConfiguration:config error:&error];
if (!realm) {
    // If the encryption key is wrong, `error` will say that it's an invalid database
    NSLog(@"Error opening realm: %@", error);
    return;
}

// Use the Realm as normal
RLMResults *dogs = [[Dog objectsInRealm:realm where:@"name contains 'Fido'"]];
This makes it so that all of the data stored on disk is transparently encrypted and decrypted with AES-256 as needed, and verified with a SHA-2 HMAC. The same encryption key must be supplied every time you obtain a Realm instance.
See our encryption sample app for an end-to-end app that generates an encryption key, stores it securely in the keychain, and uses it to encrypt a Realm.
There is a small performance hit (typically less than 10% slower) when using encrypted Realms.
Note that third party crash reporters (Crashlytics, PLCrashReporter etc.) should be registered before you first open an encrypted Realm, or you may get spurious reports of errors when the app didn’t actually crash.
Key-Value Observation
Realm objects are Key-Value Observing compliant for most properties. All persisted (non-ignored) properties on your RLMObject subclasses are KVO-compliant, along with the invalidated property on RLMObject and RLMArray.
Observing properties of standalone instances of RLMObject subclasses works just like with any other NSObject subclass, but note that you cannot add an object to a Realm (with [realm addObject:obj] or other similar methods) while it has any registered observers.
Observing properties of persisted objects works a little differently. With persisted objects, there are three times when the value of a property may change: when you directly assign to it; when you call [realm refresh] or the Realm is automatically refreshed after a write transaction is committed on a different thread; and when you call [realm beginWriteTransaction] after changes on a different thread which have not been picked up by a refresh on the current thread.
In the latter two cases, all of the changes made in the write transaction(s) on another thread will be applied at once, and KVO notifications will all be sent at once. Any intermediate steps are discarded, so if in the write transaction you incremented a property from one to ten, on the main thread you’ll get a single notification of a change directly from one to ten. Because properties can change in value when not in a write transaction or even as part of beginning a write transaction, trying to modify persisted Realm objects from within -observeValueForKeyPath:ofObject:change:context: is not recommended.
Unlike NSMutableArray properties, observing changes made to RLMArray properties does not require using -mutableArrayValueForKey:, although that is supported for compatiblity with things not written for Realm. Instead, you can simply call the modification methods on RLMArray directly, and anyone observing the property it is stored in will be notified.
In our example apps you can find a short example of using Realm with ReactiveCocoa from Objective‑C, and ReactKit from Swift.
Debugging
Debugging your Realm apps is easy, with LLDB support and the ability to view your app’s data in the Realm Studio.
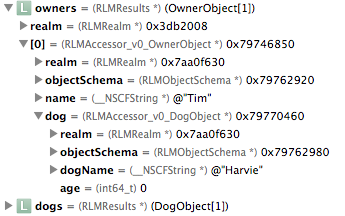
Our Xcode Plugin comes with a LLDB script which adds support for inspecting persisted RLMObjects, RLMResults and RLMArrays objects in Xcode’s UI, rather than just displaying every property as nil or 0:
N.B.: The script currently only supports Objective‑C. Swift support is in progress.
Debugging Encrypted Realms
Attaching an LLDB session to a process using an encrypted Realm is not currently supported. In some cases, you may work around this by setting REALM_DISABLE_ENCRYPTION=YES in your environment; this variable forces all encrypted API methods to work without encryption, allowing you to debug without having to change which Realm APIs you call in your app code. For obvious security reasons, this workaround will not work if you try to access an existing .realm file that was previously encrypted (this will result in an exception: File::AccessError), but it might be useful in cases where your app creates & accesses new Realm files.
Testing
Configuring the Default Realm
The easiest way to use and test Realm apps is to use the default realm. To avoid overriding application data or leaking state between tests, you can simply set the default Realm to a new file for each test.
// A base class which each of your Realm-using tests should inherit from rather
// than directly from XCTestCase
@interface TestCaseBase : XCTestCase
@end

@implementation TestCaseBase
- (void)setUp {
  [super setUp];

  // Use an in-memory Realm identified by the name of the current test.
  // This ensures that each test can't accidentally access or modify the data
  // from other tests or the application itself, and because they're in-memory,
  // there's nothing that needs to be cleaned up.
  RLMRealmConfiguration *config = [RLMRealmConfiguration defaultConfiguration];
  config.inMemoryIdentifier = self.name;
  [RLMRealmConfiguration setDefaultConfiguration:config];
}
@end
Injecting Realm Instances
Another way to test realm-related code is to have all the methods you’d like to test accept a RLMRealm instance as an argument, so that you can pass in different realm when running the app and when testing it. For example, suppose your app has a method to GET a user profile from a JSON API and you’d like to test that the local profile is properly created:
// Application Code
+ (void)updateUserFromServer {
  NSURL *url = [NSURL URLWithString:@"http://myapi.example.com/user"];
  [[[NSURLSession sharedSession] dataTaskWithURL:url
                               completionHandler:^(NSData *data,
                                                   NSURLResponse *response,
                                                   NSError *error) {
    [self createOrUpdateUserInRealm:[RLMRealm defaultRealm] withData:data];
  }] resume];
}

+ (void)createOrUpdateUserInRealm:(RLMRealm *)realm withData:(NSData *)data {
  id object = [NSJSONSerialization JSONObjectWithData:data options:nil error:nil];
  [realm transactionWithBlock:^{
    [User createOrUpdateInRealm:realm withValue:object];
  }];
}

// Test Code
- (void)testThatUserIsUpdatedFromServer {
  RLMRealm *testRealm = [RLMRealm realmWithPath:kTestRealmPath];
  NSData *jsonData = [@"{\"email\": \"help@realm.io\"}"
                      dataUsingEncoding:NSUTF8StringEncoding];
  [ClassBeingTested createOrUpdateUserInRealm:testRealm withData:jsonData];
  User *expectedUser = [User new];
  expectedUser.email = @"help@realm.io";
  XCTAssertEqualObjects([User allObjectsInRealm:testRealm][0],
                        expectedUser,
                        @"User was not properly updated from server.");
}
Avoid Linking Realm and Tested Code in Test Targets
If you’re using Realm as a dynamic framework, you’ll need to make sure your unit test target can find Realm. You can do this by adding the parent path to Realm.framework to your unit test’s “Framework Search Paths”.
If your tests fail with an exception message "Object type '...' not persisted in Realm", it’s likely because you’ve linked the Realm framework directly to your test target, which should not be done. Unlinking Realm from your test target should address that.
You should also make sure to only link your model class files to your application or framework targets; never your unit test targets. Otherwise, those classes will be duplicated when testing, which can lead to difficult to debug issues (see https://github.com/realm/realm-cocoa/issues/1350 for details).
You’ll need to make sure all the code you need to test is exposed to your unit test targets (use the public ACL in Swift 1.2, or @testable in Swift 2.0).
REST APIs
Realm easily integrates with REST APIs and provides several advantages as opposed to using REST APIs without local persistence:
- Caching your data in Realm allows you to provide an offline experience, as opposed to REST APIs where connectivity is always required.
- By caching your entire data set in Realm, you can execute queries locally and provide a better search and browsing experience than wouldn’t be possible with REST alone.
- Storing your data in Realm can reduce server-side load by only fetching new or changed data.
Best Practices
- Asynchronous Requests — Network requests and other blocking operations should be performed on a background thread to avoid blocking the user interface. For the same reason it is recommended that inserting or changing a large number of objects in a Realm are made on a background thread. You can use Notifications to respond to changes made in the background.
- Caching large datasets — We recommend you pre-fetch data when possible and store it locally in a Realm. This allows you to perform queries over your entire dataset locally.
- Insert-or-update — If your dataset has a unique identifier, such as a primary key, you can use it to easily implement insert-or-update logic using
+[RLMObject createOrUpdateInRealm:withValue:]: when receiving a response from a REST API. These methods automatically check if each record already exist and apply updates to existing records while creating new records.
Example
The following is a simple example of how you can use Realm with a REST API. In this example, we’ll retrieve a JSON-formatted data set from the foursquare API, then save it as Realm Objects in the default Realm.
For a realtime example of a similar use case in action, check out our video demo.
First we create an instance of the default Realm to persist the data to, and fetch our data set from the API. For simplicity in this example we use [NSData initWithContentsOfURL].
// Call the API
NSData *response = [[NSData alloc] initWithContentsOfURL:
                    [NSURL URLWithString:@"https://api.foursquare.com/v2/venues/search?near=San%20Francisco&limit=50"]];

// Deserialize the response to JSON
NSDictionary *json = [[NSJSONSerialization
                       JSONObjectWithData:response
                                  options:kNilOptions
                                    error:&error] objectForKey:@"response"];
The response contains a JSON array of venues similar to this:
{
  "venues": [
    {
      "id": "4c82f252d92ea09323185072",
      "name": "Golden Gate Park",
      "contact": {
        "phone": "4152522590"
      },
      "location": {
        "lat": 37.773835608329,
        "lng": -122.41962432861,
        "postalCode": "94103",
        "cc": "US",
        "state": "California",
        "country": "United States"
      }
    }
  ]
}
There are several ways we may want to import this JSON into our Realm. You could read the NSDictionary and map the properties to a single RLMObject manually via a custom insert function. For the sake of this example, we will instead directly insert the NSDictionary in the Realm and have it automatically be mapped to a hierarchy of RLMObjects that will be created on the fly for us. For this to work, we need an RLMObject structure whose properties will match all the keys in the JSON exactly. JSON keys not matched by an RLMObject property will be ignored on insert. The following RLMObject declarations would work:
// Contact.h
@interface Contact : RLMObject
@property NSString *phone;
@end

@implementation Contact
+ (NSString)primaryKey {
    return @"phone";
}
@end
RLM_ARRAY_TYPE(Contact)

// Location.h
@interface Location : RLMObject
@property double lat; // latitude
@property double lng; // longitude
@property NSString *postalCode;
@property NSString *cc;
@property NSString *state;
@property NSString *country;
@end

@implementation Location
@end
RLM_ARRAY_TYPE(Location)

// Venue.h
@interface Venue : RLMObject
@property NSString *id;
@property NSString *name;
@property Contact  *contact;
@property Location *location;
@end

@implementation Venue
+ (NSString)primaryKey {
    return @"id";
}
@end
RLM_ARRAY_TYPE(Venue)
Since the result set is given to us as an array we have to create an object for each element by calling [Venue createInDefaultRealmWithValue:]. This creates Venue and its child objects from a JSON representation and adds the newly created objects to the default Realm:
// Extract the array of venues from the response
NSArray *venues = json[@"venues"];

RLMRealm *realm = [RLMRealm defaultRealm];
[realm beginWriteTransaction];
// Save one Venue object (and dependents) for each element of the array
for (NSDictionary *venue in venues) {
    [Venue createOrUpdateInDefaultRealmWithValue:venue];
}
[realm commitWriteTransaction];
Current Limitations
Realm is currently in beta and we are continuously adding features and fixing issues while working towards a 1.0 release. Until then, we’ve compiled a list of our most commonly hit limitations.
Please refer to our GitHub issues for a more comprehensive list of known issues.
General Limits
Realm aims to strike a balance between flexibility and performance. In order to accomplish this goal, realistic limits are imposed on various aspects of storing information in a realm. For example:
- Class names must be between 0 and 63 bytes in length. UTF8 characters are supported. An exception will be thrown at your app’s initialization if this limit is exceeded.
- Property names must be between 0 and 63 bytes in length. UTF8 characters are supported. An exception will be thrown at your app’s initialization if this limit is exceeded.
- NSData properties cannot hold data exceeding 16MB in size. To store larger amounts of data, either break it up into 16MB chunks or store it directly on the file system, storing paths to these files in the realm. An exception will be thrown at runtime if your app attempts to store more than 16MB in a single property.
- NSDate properties can only persist date information down to one second. Refer to the NSDate entry in Current Limitations below for more information.
- Any single Realm file cannot be larger than the amount of memory your application would be allowed to map in iOS — this changes per device, and depends on how fragmented the memory space is at that point in time (there is a radar open about this issue: rdar://17119975). If you need to store more data, you can map it over multiple Realm files.
Fine-grained notifications are not yet supported
While it is possible to receive notifications when a realm changes (see Notifications), it is not currently possible to determine what was added/removed/moved/updated from that notification. We will be adding this feature in the near future. Key-Value Observing can be used for per-object change notifications, including detecting when a specific object is deleted.
NSDate is truncated to the second
Persisting an NSDate with a fractional number of seconds will truncate the date to the second. A fix for this is in progress. See GitHub issue #875 for more details. In the meantime, you can store NSTimeInterval properties with no loss in precision.
Realm Object Setters & Getters cannot be overriden
Since Realm overrides setters and getters to back properties directly by the underlying database, you cannot override them on your objects. A simple workaround is to create new, realm-ignored properties, whose accessors can be overriden, and can call other setters/getters.
File size & tracking of intermediate versions
You should expect a Realm database to take less space on disk than an equivalent SQLite database. If your Realm file is much larger than you expect, it may be because you have a RLMRealm that is referring to an older version of the data in the database.
In order to give you a consistent view of your data, Realm only updates the active version accessed at the start of a run loop iteration. This means that if you read some data from the Realm and then block the thread on a long-running operation while writing to the Realm on other threads, the version is never updated and Realm has to hold on to intermediate versions of the data which you may not actually need, resulting in the file size growing with each write. The extra space will eventually be reused by future writes, or may be compacted — for example by calling writeCopyToPath:error: .
To avoid this issue you, may call invalidate to tell Realm that you no longer need any of the objects that you’ve read from the Realm so far, which frees us from tracking intermediate versions of those objects. The Realm will update to the latest version the next time it is accessed.
You may also see this problem when accessing Realm using Grand Central Dispatch. This can happen when a Realm ends up in a dispatch queue’s autorelease pool as those pools may not be drained for some time after executing your code. The intermediate versions of data in the Realm file cannot be reused until the RLMRealm object is deallocated. To avoid this issue, you should use an explicit autorelease pool when accessing a Realm from a dispatch queue.
FAQ
How big is the Realm library?
Once your app is built for release, Realm should only add around 1MB to its size. The releases we distribute are significantly larger because they include support for the iOS and watchOS simulators, some debug symbols, and bitcode, which are all stripped by Xcode automatically when you build your app.
Should I use Realm in production applications?
Realm has been used in production in commercial products since 2012.
You should expect our Objective‑C & Swift APIs to change as we evolve the product from community feedback — and you should expect more features & bugfixes to come along as well.
Do I have to pay to use Realm?
No, Realm is entirely free to use, even in commercial projects.
How do you all plan on making money?
We’re actually already generating revenue selling enterprise products and services around our technology. If you need more than what is currently in our releases or in realm-cocoa, we’re always happy to chat by email. Otherwise, we are committed to developing realm-cocoa in the open, and to keep it free and open-source under the Apache 2.0 license.
I see references to a “core” in the code, what is that?
The core is referring to our internal C++ storage engine. It is not currently open-source but we do plan on open-sourcing it also under the Apache 2.0 license once we’ve had a chance to clean it, rename it, and finalize major features inside of it. In the meantime, its binary releases are made available under the Realm Core (TightDB) Binary License.