Estimated Time: 15 minutes
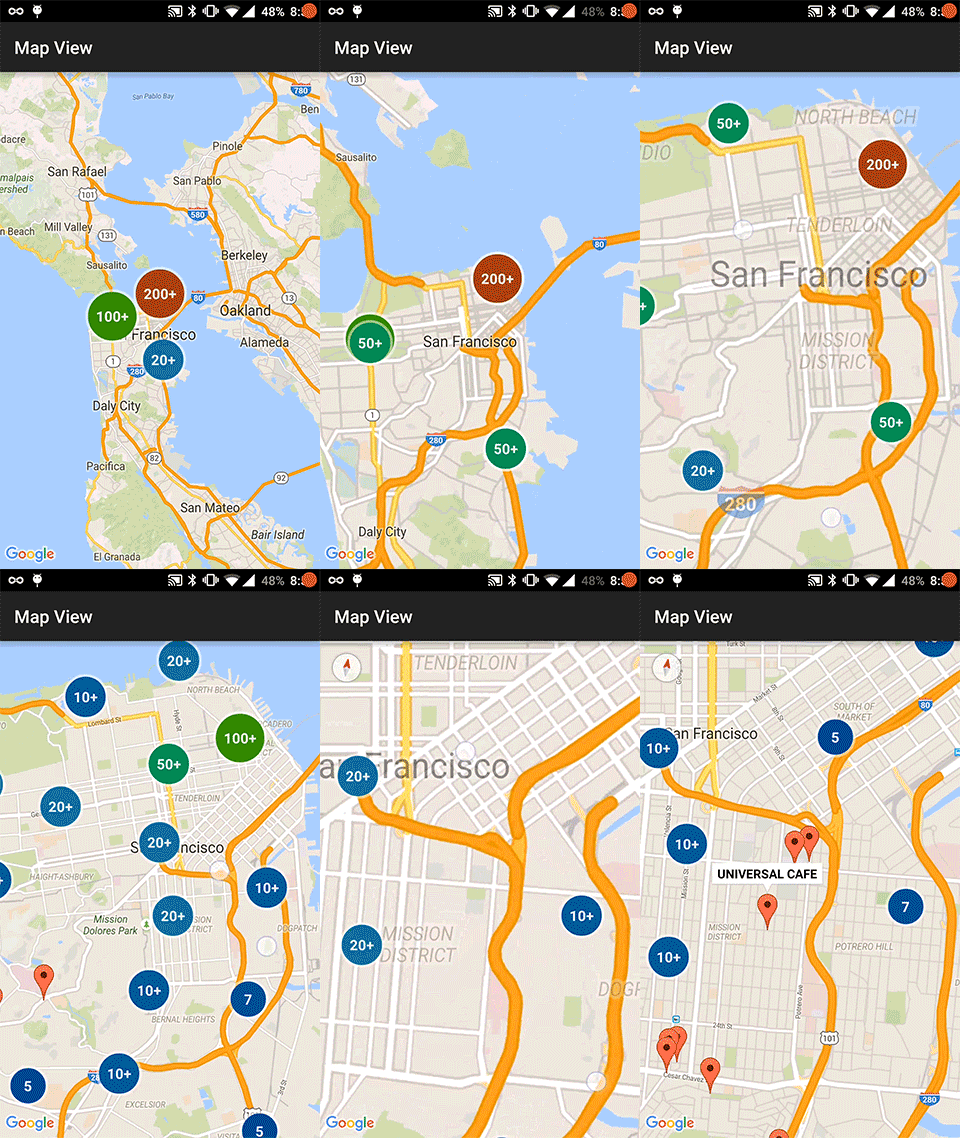
The RealmClusterMapFragment class wraps the SupportMapFragment and supports clustering. It manages real-time data fetching and displaying for a Realm object subclass that contains coordinate data. In addition, the map view clusters markers based on zoom level by default.
This allows for the creation of a map with little to no code by subclassing a single class.
You can see the code for RealmClusterMapFragment on GitHub

Overview
Location data plays a big role in building a great mobile app experience. Maps are immersible and users are increasingly demanding of a highly-responsive experience.
RealmClusterMapFragment simplifies creating a dynamic map in your app by utilizing the fast query speed of Realm. You can now implement real-time fetching on map panning and zooming with automatic clustering in just a few minutes!
Just store your location data in Realm and then let RealmClusterMapFragment know the class of objects you want it to display, and the names of their latitude and longitude attributes.
In the tutorial below we will go over how to install RealmClusterMapFragment, sith some sample data to display a highly functional map in your application. Let’s get started!
You can see the final working code on GitHub here.
Tutorial
Note: You will need a Google Maps API V2 API key to run this sample. Get one here.
Create a new Android Studio project, using the “Empty Activity” template.
RealmClusterMapFragment is available as a gradle dependency via jitpack.io.
Add the following line to your project’s build.gradle file.
maven { url "https://jitpack.io" }The result should look like this:
allprojects {
    repositories {
        jcenter()
        maven { url "https://jitpack.io" }
    }
}
Now in your app module’s build.gradle file, add the following line
compile 'com.github.thorbenprimke:realm-mapview:0.9.1'That’s it, re-sync the dependencies and you are ready to go.
For this tutorial we are also going to use a sample data set. This data set contains a list of San Francisco restaurants. The data will be loaded into Realm so we can interact with it.
To Add the sample data set add the following line to the app module’s build.gradle file -
compile 'com.github.thorbenprimke:realm-sfrestaurant-data:0.9.1'Now that we have our base project setup, it’s time to subclass the RealmClusterMapFragment and integrate it.
Integration
Create a new Fragment in your application with the name BusinessRealmClusterMapFragment and extend the RealmClusterMapFragment with the type parameter of Business. You will need to implement three abstract methods in the BusinessRealmClusterMapFragment. These methods will provide the title, latitude and longitude column names. In order to obtain the title, latitude and longitude we are going to use the Business (source) object that is provided by the sample data project.
The result should look like the following:
public class BusinessRealmClusterMapFragment extends
    RealmClusterMapFragment<Business> {

    @Override
    protected String getTitleColumnName() {
        return "name";
    }

    @Override
    protected String getLatitudeColumnName() {
        return "latitude";
    }

    @Override
    protected String getLongitudeColumnName() {
        return "longitude";
    }
}
Now that the fragment is created, let’s add it to the MainActivity’s layout file. Replace the contents of the main_activity.xml file with the following:
<?xml version="1.0" encoding="utf-8"?>
<fragment
    xmlns:android="http://schemas.android.com/apk/res/android"
    android:name="co.moonmonkeylabs.realmmap.example.BusinessRealmClusterMapFragment"
    android:id="@+id/map_fragment"
    android:layout_width="match_parent"
    android:layout_height="match_parent"/>
In the MainActivity’s onCreate() method implement the following code.
@Override
public void onCreate(Bundle savedInstanceState) {
    super.onCreate(savedInstanceState);
    // Sets default realm with sample data module
    Realm.setDefaultConfiguration(new RealmConfiguration
            .Builder(this)
            .setModules(Realm.getDefaultModule(), new SFRestaurantModule())
            .build());
    // Loads and adds sample data to realm
    new SFRestaurantDataLoader().loadBusinessSmallDataSet(this);
    // Sets layout with map fragment
    setContentView(R.layout.main_activity);
}
In the code above the sample data is being loaded and Realm’s default configuration is set prior to the setContentView() method so the data and Realm are both available prior to when the fragment is instantiated (in setContentView).
Please note, the default Realm config has to be updated to include the SFRestaurantModule (source) module which adds the Business class to the Realm schema.
Before the app is ready to run, a Map v2 key has to be added to the your projects’s AndroidManifest.xml file. You can obtain a key from Google Developer Console
Once you have the key, add it to the AndroidManifest.xml file, in the application element, as shown below (full example).
<meta-data
    android:name="com.google.android.maps.v2.API_KEY"
    android:value="YOUR_KEY"/>
Run It
Fire up the app; you’re done! Congrats and happy mapping!


Receive news and updates from Realm straight to your inbox