My name is Dave. I’m a developer advocate at Google. I work on the internet of things (IoT) platforms team. I’m here today to talk about Android Things.
We’ve all heard of IoT, and different people have different definitions. Today I’m going to refer to IoT as building smart connected devices. Smart devices, a device that we can program with some application software. A connected device could be a device that’s connected directly to the open web, directly to the cloud. It could be connected to an ethernet network or a wifi network in your home, but it has a direct route to some cloud service. But, it might also be a device that’s not necessarily connected to the public web, or at least, not directly. Maybe, it’s connected to some an intermediate device. In IoT terms, we would refer to that device as a gateway, or maybe a bridge. This might be the case if the device itself doesn’t actually have a radio, or a network interfacethat you can use to connect directly to that. Maybe it has a low power mesh radio (Zibgee or Thread), bit it still potentially might still get access to the internet indirectly through another device. That would be typically considered something like a gateway or a bridge device. A device that is as far away as you can get, potentially, from the central cloud, is considered an edge device.
What Is “Android Things”?
Android, as an operating system, has extended over a variety of different form factors over the course of it’s life. It started as being designed for mobile phones, tablets, and those types of devices. But we’ve also seen Android extended to wearable devices, Android TV, Android Auto, and Android Things is another extension of that platform. It’s another variant or another form factor that Google is supporting Android in that particular use case. In this case, it’s specific for embedded or IoT use cases. You have the power of the Android framework at your fingertips for building these types of devices that you might have for embedded and IoT use cases. This is not new, but it’s new for Google to support this effort, which is important.
From Prototype to Production
Let’s take a step back and look at the whole platform in general. Android Things is, in fact, an operating system that lives on the device, and that’s important, but it’s not the only piece of the puzzle. The other peaces that surround it might almost be more important.
We want to help facilitate developers in building embedded devices or products that they can actually take to market in the same way that we might have enabled developers to build mobile apps. In providing the infrastructure and the services necessary to make that as easy as possible for all of you.
The first way is On Device. You have all of the Android framework available to you when you’re building apps. All of the APIs associated with camera, Bluetooth, media, audio playback and recording, all of these things that you as developers are already familiar with, you can reuse those exact same APIs, in a different way. And that’s extremely powerful because those are the types of use cases that we’re starting to see become very popular in IoT.
You’re already familiar with Android Studio. And you can use those same tools to develop, debug, and deploy your applications. When you have an Android Things device, you connect it to your computer like you would a development phone, you connect over ADB, and you can still deploy your application to that device using the exact same process. There’s nothing new to learn with regards to that development.
Android in the embedded space is not necessarily new. Android is open source, and people have been using it since the beginning of it’s inception as a platform that they could take, modify, build, and put on to their own devices. But they were limited to only using the APIs and the framework that were provided as part of Android open source. They weren’t able to access all of the Google service that you, as mobile app developers, often take for advantage because those aren’t on the open source platform. Android Things, as a certified variant of Android, also has all of the Google services enabled. So you can use Google Play services, Firebase, Google Cloud, all of the APIs that connect to Google services that you’re probably already familiar with. You can access inside of Android Things, where you might not have been able to do that at Android embedded before. That’s a big win for getting these devices on line and connected, especially since many of these have to do with back end cloud services.
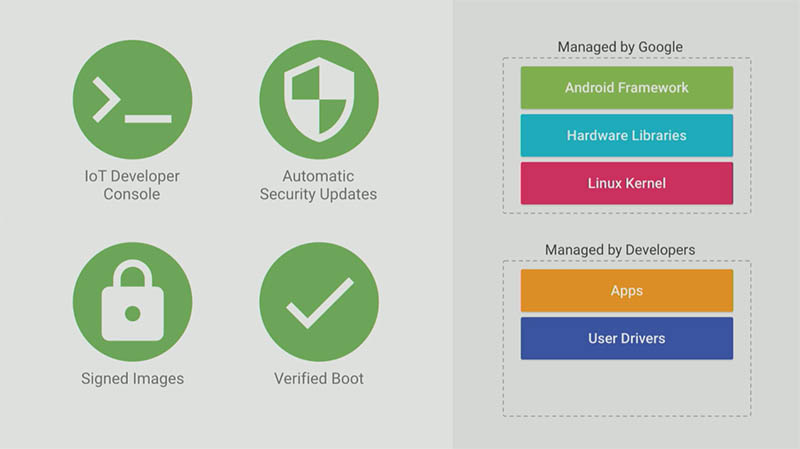
Beyond the device, there’s more to this story. You know, one of the things that made the app ecosystem so great for a lot of developers, is the distribution mechanisms that platform makers like Google brought through things like the Play Store. Not only am I able to develop the application using this amazing rich framework, but there’s a distribution mechanism to get my software into other people’s hands, and not only from a discovery perspective, but also from a delivery and updates perspective. If someone is installing the app for the first time, or if they’re getting an update that I created that I want to push out to all my existing users, the Play Store allows you all of that functionality, and you don’t have to write or maintain any of that infrastructure.
Managed by Google, Managed by Developers
We want to do a similar thing for the IoT ecosystem. The Play Store is not supported on Android Things (and we’re not expecting to do anything quite like that). But the same idea should still be alive and well. We’re expecting to do is provide to developers what we’re calling the IoT Developer Console. And this is a place like Google Play, where you could build an application, upload it to the console, and have it distributed to the various devices that you’ve shipped out into the marketplace. The difference is that we’re not installing apps on these individual devices. The IoT Developer Console is going to take your code, package it up with the code that we’re responsible for managing, which is essentially all of the core operating system, and build a fully fledged over the air update for the entire system that gets delivered down to that device. The same way that you have on your Android phone, you would get an update from the device manufacturer. We process and handle all of that, in terms of packaging the image, signing it appropriately, delivering it to the device. All you have to manage is, again, the application level that you’re already used to working with. And there’s a note in there about drivers.
When there are updates on the platform side, that’s stuff we’re responsible for. When there are security updates, or the monthly security patches that are part of Android, we can rebuild your image and automatically deploy it to devices with those security fixes. You don’t have to do anything if you don’t want to be part of that process. If there are platform updates, we can help with getting your new device onto the new platform version of Android. There’s a couple things that we can do on our side to manage the operating system, and all you have to worry about is your apps. From that perspective, it’s very similar to working with the Play Store. You’re more of a participant in the overall system stack even though you don’t have to manage it.
We’re also leveraging the existing infrastructure that’s already in place to install and update versions of Android on devices today. Images are signed by Google, they’re delivered using the existing OTA update mechanisms, which means we have verified boot functionality that allows the device to ensure that that image is correct, signed, not corrupted during the download. We also use the A/B update mechanism inside of Android to make sure that that download is handled in the background silently so that the downtime of the device is minimized, which is nice on a user’s Android phone, it’s critical in an IoT application, where the user might not even be looking at that device regularly, if at all. All of that infrastructure is on us, and we’re helping provide that to you so that you can keep your devices up to date and maintained after they’ve shipped and while they’re in the field.
Hardware
In addition to all of the software services that we’re providing, we’re also facilitating a number of supported hardware platforms to simplify the process of actually building a physical device. One of the hardware platforms we support is the Raspberry Pi 3. Many people have them. It’s a great platform for the maker market, the hobbyist market, and it’s inexpensive, it’s easy to prototype with. If you already have one, or you’re interested in buying one, it’s a great platform to get started and play around with some of this stuff. But it’s a difficult platform to productionize. From a hardware perspective, as well as an electronics design perspective, there are things about the platform that make it hard to build in quantity.
We want to provide other options if you actually want to use a platform like Android Things to take a product to market. All of the other platforms that we support (two from Intel, two from NXP), each of those platforms has a common pattern to the way they’re designe: system on module (SOM) based architecture. It’s the design idea that all of the core electronics, the CPU, the memory, the wifi interface (all of the complicated stuff) lives on a relatively small module over the larger board that you might buy as a developer kit.
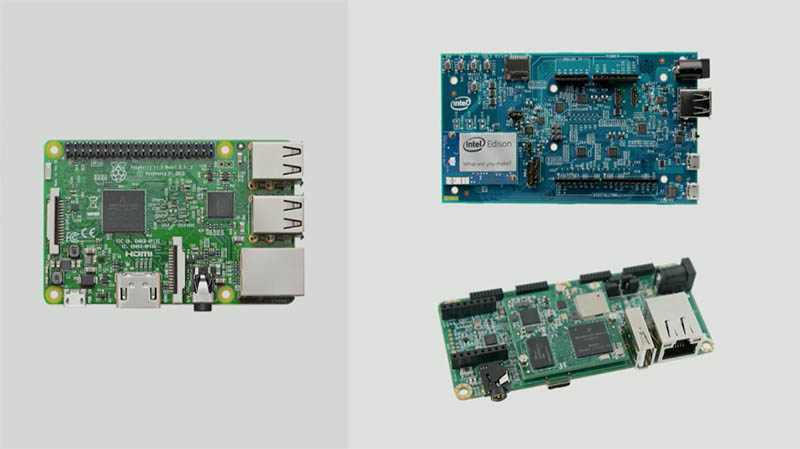
For instance, that’s the Edison module, the NXP module down there. And you can see that it’s stacked on top of another board. When you buy a developer kit, you get the core module sitting on top of another board (carrier board or a breakout board) that takes the complicated electronics and breaks them out into connectors that are easy for you to work with. You can plugin your USBs, you can wire in your different peripherals, your buttons and LEDs, and it’s easy to do by hand. But once you go from that prototype into production, all you essentially have to do is replace the baseboard with something that’s custom of your own design. You don’t have to deal with messing with any of the electronics directly (e.g. laying out the CPU, or all of the other pieces that, in this case, Intel and NXP have done for you). The boards that you have to build, or the designs that you have to come up with are simple from an electronics perspective. You don’t have to add anything beyond what is necessary for your application.
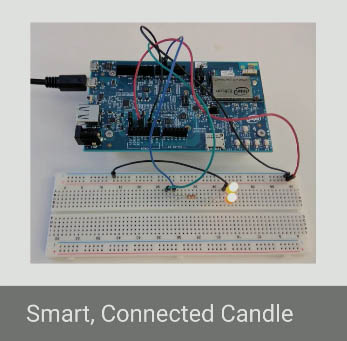
Let’s say, for example, that I want to build a smart connected candle device, and I want to ship this worldwide. First, I want to use Android Things for this because I’m an Android developer, I understand that whole ecosystem. I go to the website, I see what developer kits are available, and I land on the Intel Edison. I buy an Edison developer kit, and I start prototyping my idea. This is a candle, so it’s going to have a couple of LEDs on there, I’m gonna wire those up to the right pins, I can control the brightness of those, and create an effect of flickering the candle like you would see in a restaurant.

You go through, you buy the developer kit, and you prototype out this idea. You’ve the application code, everything’s working right. Next, if I want to build a candle, I need to be able to fit what I’m doing in something this size. But if you look at the developer kit and that board, that’s not going to fit. I need to do a custom design that will take my developer prototype and shrink it down into something that will fit in the housing that I want to build. (see video) This is a little Intel Edison running the same software that’s on our prototype, but in this case, the hardware has been customized to fit the application. Everything’s been shrunk down: the components on that board are very few (less than 15 components). It’s the module, the connector to bring power in, and the LEDs so that I can blink them. Everything else, all that other stuff that was on that board, I don’t need.
I didn’t have to figure out how to do routing for CPUs, and memory, and antennas, and all that. That’s all on the module. All I had to do was create the interfaces that were necessary for my application, power in, blinky lights out, that’s it, and then build that onto a custom board for my specific application. And then, for all the complicated pieces, I take the module off the developer kit, stick it on my design, and put it in the housing. And all of the software ports right over. Because the BSP that we’ve provided, and your application, that’s targeting the module itself, not necessarily the kit that you bought originally. When you move over to your other design, it runs the exact same software. All you have to do is make that quick change. This SOM based architecture is important in terms of facilitating taking these products to market and actually building something that you can do in production. These modules are small, you can buy them in low quantity, or high volume, and the custom design that you have to do is simpler than it would be if you were building an entire embedded system with all those other components on it.
TensorFlow
But do we really need a duel core x86 processor to blink a couple of LEDs? Of course not. It makes a great demo, but it’s absolutely not necessary. If we were building this product for real, we probably wouldn’t need something that has quite the horsepower of an Intel Edison or an Android Things platform. The sweet spot for Android Things use cases are those gateway style devices that I mentioned before, or edge devices that require some significant amount of computation processing to happen out at the edge. Maybe you don’t have a network connection all the time, or you have some intensive processing you want to do on the device beyond blinking a couple of LEDs. That’s why we created this sample.
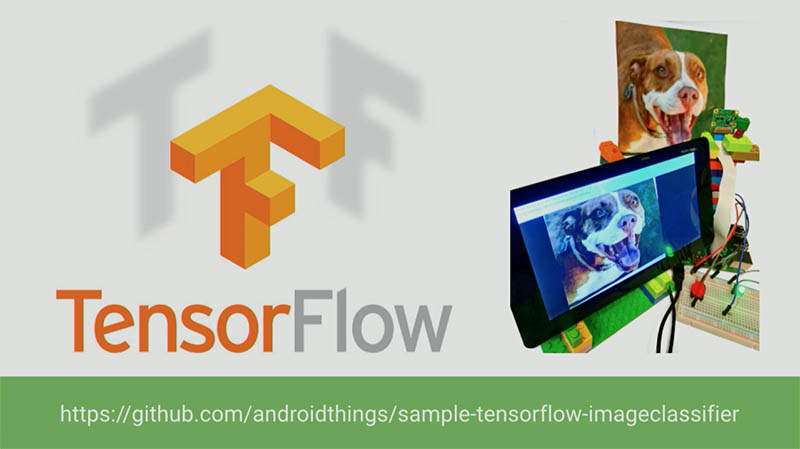
One of the samples that we released in a recent preview a while back is a TensorFlow sample, which is basically running Android Things with TensorFlow on the device. One of our early samples, for example, was a cloud connected doorbell. And this allowed you to capture an image from the device’s camera, send it up to the cloud vision API, and then the Cloud vision API would annotate that image with various things about it (e.g. there are people in this picture, there’s a dog in this picture), and return that back to a companion app. But what if you wanted to do the same type of functionality, and you didn’t have a network connection?
The TensorFlow sample does something similar, but it classifies those images locally on the device, using a pre trained TensorFlow model. The TensorFlow model that’s in the sample will classify images of dogs. We’ve trained the TensorFlow model so that you can take a picture of any dog, and it will classify that the breed of what that dog is based on the image and report that back to you. And it will do that without a network connection because it’s all running locally on the device. That type of computation requires an Android class system, or something of a higher order that a low powered micro controller that you might be able to use to blink some lights is not necessarily going to be able to do this. You figure out what your use case is, and see if a platform like Android Things has the hardware to support it.
Developer APIs.
Android Things and Android are similar. I mentioned that the Android framework is there for you, and that was mostly true. I’ll tell you about some of the differences here that you might expect if you’re actually starting to develop for the platform.
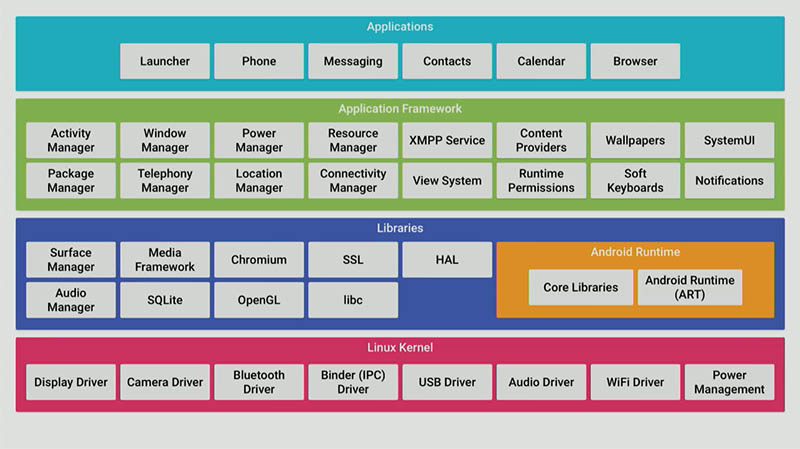
This is a basic stack diagram of what the Android operating system looks like (see video): you’ve the core stuff underneath, the application framework in green. That’s the area of the system that your code touches (the system services for power management, activities)t. And then, we have the built in applications all the way up there at the top, e.g. the Phone app, the Context app, all of that stuff that’s prebuilt into any of your Android devices. This is what a traditional Android mobile device looks like.
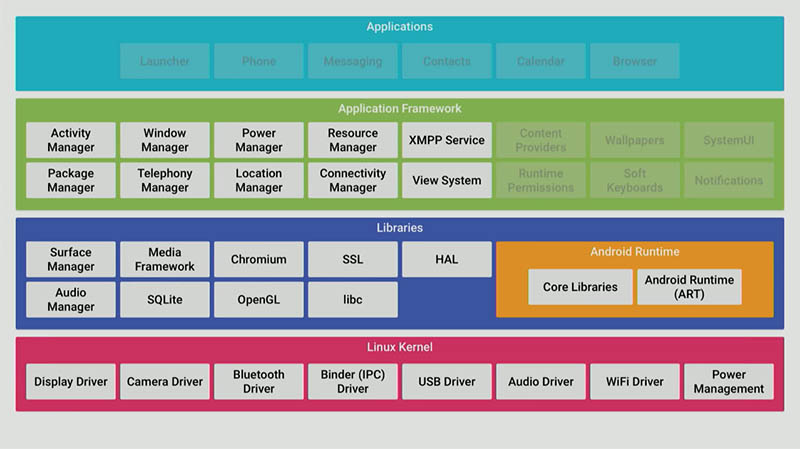
Android Things looks like this (see video): all of those core apps have been removed. Your app is the only app running on the device. It leads from a user’s perspective. There are some services in the framework running in the background, but all of the user facing applications aren’t there, there’s no need for them. Your app is essentially the only one that this device should be running. In addition to that, we have made some slight modifications to the framework because of some differences in Android Things.
Android Things does not require a display. Whereas, typically, and Android phone or tablet assumes that there is a graphical display. But my little candle doesn’t have a graphical display (it has a UI, it has some blinky lights, but it doesn’t actually have a display). And that’s okay, Android Things supports that. There are only a handful of our platforms that we support currently that have display capability. The Raspberry Pi and the Jewel being the two. The others do not.
You might be building an application that doesn’t have a display, which means you’re not using views, or any of those other things, but they are actually still there, because you might. You could build an app that has a UI, or you could build an app that doesn’t. The view system is still available to you if you want to build layouts, and buttons, etc. However, some of the other system level functionality that assumes a display is not. We’ve taken away the system UI functionality.
If you pull out your Android device, you look at the screen, there’s a number of things on that display that are controlled by a system service called system UI. The status bar at the top, the navigation buttons at the bottom, the window shade for your notifications - all of these things come from one package called system UI. And we’ve removed that from Android Things. Even if you have a display, your app will take up the full real estate of the screen. There’s nothing else on that display to take away from your application. That has side effects because that means that APIs, like the notification system, don’t make any sense because there’s no space for us to display those things. In Android Things, the notification manager APIs are disabled for the display reason.
Similarly, because displays are optional, we can’t assume that a display is there in cases where the system would want to show the user a dialog for some reason. The most common reason would be runtime permissions. In Android Things, the permissions model is based on falling back to the install time permissions model for your apps. When you build an app in Android Things, even though it’s based on Android the end release, when you request permissions inside of your app manifest, they’re automatically granted to you by the system. There’s not dance back and forth with the user in terms of requesting the dialog because that might not even be possible. There are other APIs that show system dialogs (the USB APIs); the dialogs have been defeated in some way.
Home Activity
There’s some variants in behavior there that you might see if you’re using an API that assumed a display for some type of a user system dialog. If you’re building an app for Android Things, what does that look like? You start an application project, looks like any other application project. It’s gonna have an activity in it, and that activity is your main entry point into your application.
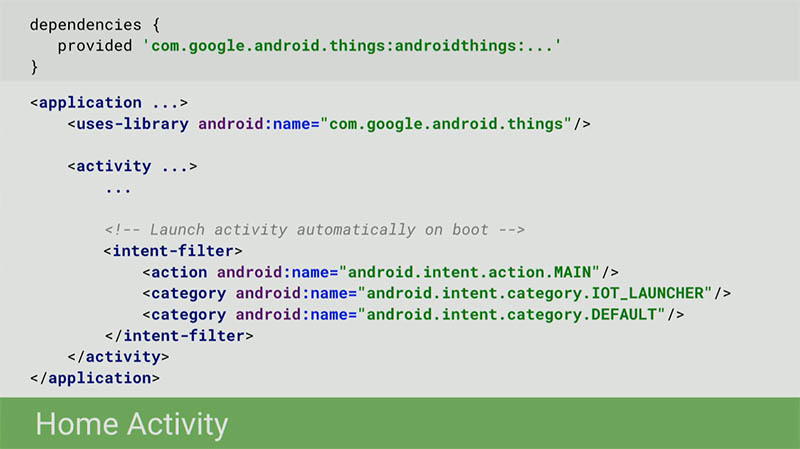
This might seem a little weird at first since you might not, necessarily, have a display. If I don’t have any views, why do I need an activity? And it turns out that the activity is more than the window you display. The activity is really a component around the what is currently in focus of the user. There’s system events that go through the activity that have nothing to do with display. For example, key events, motion events for external game controllers or other things that you might have connected, are routed to whatever the foreground activity is. You still need an activity for whatever your UI is, even if it’s not a display. Maybe it’s a controller, maybe it’s some buttons, all of those events are going come into that component still.
There’s a new support library (which is that dependency up there at the top that you’ll want to include in your app). This support library is built into the image. You need to add it to your dependencies is because it’s outside the core framework, so your app will compile. Because you don’t need to copy it into your app, you use a provided keyword instead of a compile keyword in your build doc Gradle file. But it’s like adding another support library into your app dependencies.
When you’re creating your main activity, you need to make sure that at least one of the activities in your application has this IoT launcher intent filter in it. Again, because these devices don’t have a traditional launcher type experience that you would expect to find inside of a traditional Android device, then there’s not launcher for the user to go picking an app. Instead, we will automatically launch your application after the system has booted. And the way that the system is going to select which app and which activity to launch first is it’s going to look for that intent filter.
You’re going to build an activity based application, same as you always have, you need to add that dependency, and then add that intent filter on whatever your main or primary activity is.
APIs
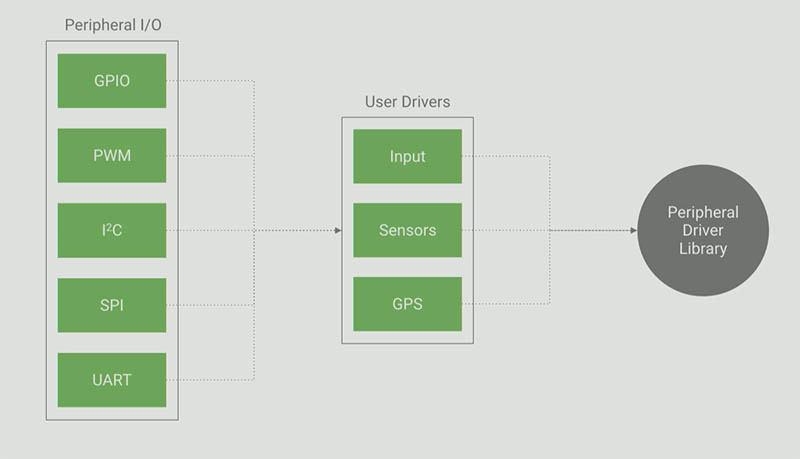
APIs fall into two primary categories. The first is we’ve added what we call the peripheral IO API; a number of different APIs that allow you to interact at a low level with various peripheral devices that you might have connected to your system. For example, GPIO, PWM, I2C, SPI, and UART (ee have guides on the docs that explain what each of those interfaces are for and where you might commonly find them). Think of them as common interfaces that sensors and other peripherals that you’ll buy in the market will use to communicate with your host system. SPI, I2C, UART, these are serial protocols. We could use those to communicate with a temperature sensor or an accelerometer, or something that we wanted to attach to our device.
We’ve also created a series of APIs that we call the user driver. And this is something that you may or may not use depending on what your application is. Beyond integrating with the actual peripherals themselves, you might also want to take the data from those peripherals and inject them into existing framework services. We support three categories: the input system, the sensor system, and GPS.
I’ll give you a couple of examples. Let’s say that you are adding your own GPS module to whatever your custom device is, and rather than reading the raw data off the GPS, you would prefer to access those using the location manger APIs that are already in Android. We can do that, but since you added the GPS, Android doesn’t know about it. You would write a user driver that takes the low level data off the module and injects it into the framework so that it can broadcast the location updates associated with that element. Similar if you add a temperature sensor or an accelerometer. These are things that Android sensor manager framework already has APIs for dealing with. But since it doesn’t know about your sensor, you need to inject the data from that hardware into the system to make those other APIs work with your new hardware.
There are a variety of reasons why you might do that. Maybe it’s easier for your application code to work with APIs it’s already written for if you’re porting an existing app. Maybe the developers that you’re working with, it’s easier to have that interface and not deal with the new peripheral APIs. Also, the Android framework does extra bits with this data that if you are reading the data yourself you won’t get that information for free. The perfect example is GPS and location. If the framework knows about your GPS updates, it can attach that information to the fuse location provider that it uses along with network sources to provide you with more accurate location updates in your app. If Android knows about the data coming from the GPS, it can provide that to you. It it doesn’t, you’re reading raw data off of a GPS module. Often times, it’s best to inject these into the framework to get some of those additional benefits, even if you didn’t necessarily know at the surface that they were there.
Lastly, not technically in the support library, is the peripheral driver library (open sourced), a host of pre written drivers that we have provided for common peripherals that you might go out and buy from standard retailers, e.g. Adafruit, SparkFun, Seeed. Common GPS chips, sensors, if you go out and buy these things or the peripherals that you’ll see in some of our starter kits, the driver library has pre written drivers for those, so that to get you started quickly, you can wire something up, load in a couple of additional drivers, and get going with a few lines of code without necessarily having to learn how the I2C protocol works, if you’re not already familiar with it.
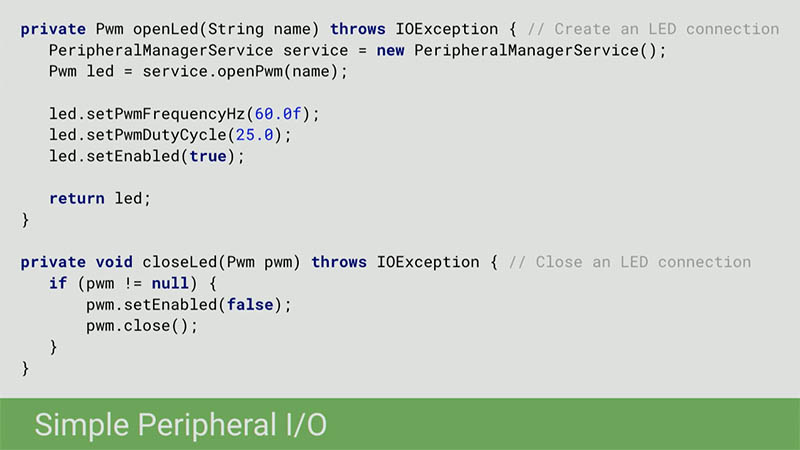
I wanted to walk you through some of the code. Each of these LEDs on my little candle here are connected to what’s called a PWM (pulse with modulation) - an output that I can vary between zero and 100%. And that allows me to control the brightness of those LEDs. I’ve two PWMs, and each one of them is connected to one of these LEDs. In the Android application code, I accessed those APIs using this new thing called a peripheral manager service. This is very similar to any other manager that you would use in the Android framework, even though the instantiation’s a little bit different. You would use that to open a connection to each of those PWMs. You can use the APIs to initialize that state to whatever you want. A PWM is basically a variable output; setting things like the duty cycle, allow me to tell it how frequent that output should be on (25 is 25%; 25% of the time it’s on, which is a fairly dim LED thing. If I draw it up to 100%, that’s full brightness). We can use things like that to control it and then turn it on. Similar to other hardware resources in Android, when you’re not using these connections, you’re going want to close them.
Simple Peripheral I/O
From the peripheral IO perspective, that could be as simple as it gets. It’s instantiating that service, and opening and closing connections to the pins so you can configure them. But once we have this in a framework like Android, what else can we do?
If I were to write this type of an example using a micro controller or some other embedded system, in order to get that blinking effect to occur, I would have to write some timer, or some loop, or something to actually figure out what the brightness should be and constantly setting that value. But, since I’m running an Android, I’ve this property called brightness, and I want to change it’s value over time. That’s an animation. Why don’t I build an animation that animates the property of my hardware, and then use the animation APIs to do the rest. And then it turns out my code is very simple.
Animating Hardware
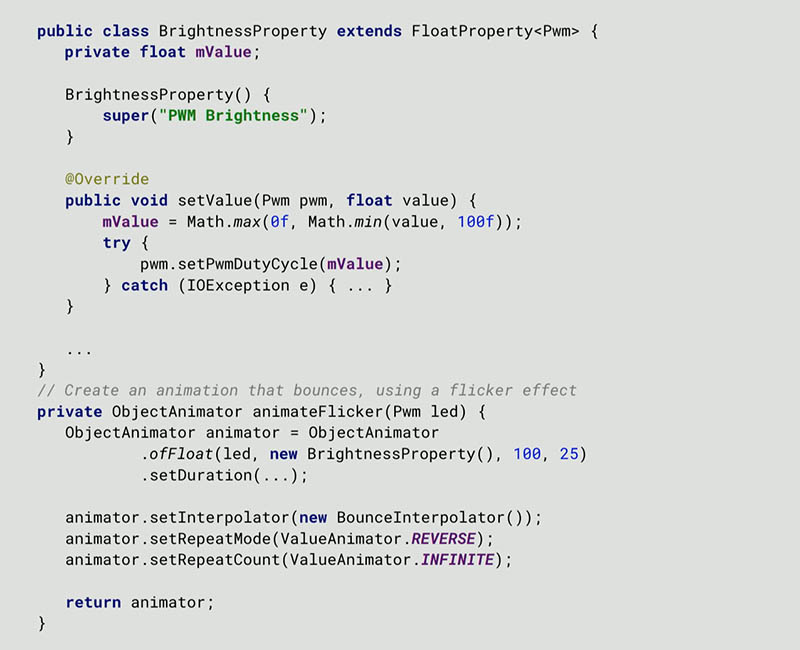
In this example we create a new animatable property called brightness that simply updates the duty cycle of the PWM between zero and 100%. And once I have this little wrapper, I can attach it to the existing animation APIs (in this case, using an object animator), and I can tell it to animate that PWM value between (in this case, 25% and 100%). And I can now also use the facilities of the animation API to do all of the other work for me. I can tell it to run this animation infinitely, I can tell it to auto reverse (so that it goes bright, and then dim, and back and forth), and I can even use interpolators to create the flickering effect that I want the LEDs to do. The is bounce interpolator is a build in interpolator in the framework that takes the animated value and oscillates it a little bit at the end before it settles. Which works great for flickering my little LEDs.
All I need to do is those handfuls of lines of code, and associate it with the others before to create the PWM, start an animation, then I’m done. I have no timers, no loops, no handlers, no nothing. The animation framework is taking care of everything for me until I decide to tear this down at some point. It’s an interesting way to look at existing APIs that you’ve probably used 100 times, but applying it now to something other than moving a view on a screen. I’m still animating a property, I’m animating something physical an hardware instead of the actual display.
Summary
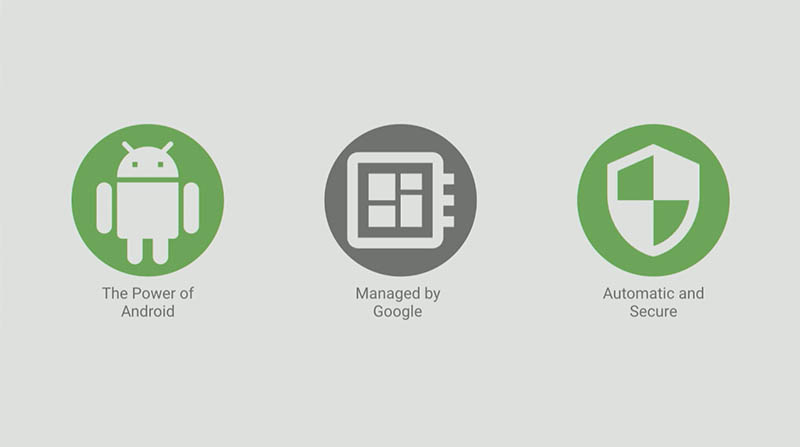
To wrap up here a couple things about the Android Things platform. As you walk away from this, is Android Things something I want to play around with?. The idea is that Android Things is a platform that allows you to take the power of Android, (and I would say the power of Google, because of Play services and and other things like that), and apply that to embedded development, or IoT style development. This is something that’s managed by Google. Unlike if you were forking AOSP, we’re going to help you manage these updates, push them out to devices, you’re getting Google services, and all of that is part of the package. We also are gonna be responsible for security updates. When the platform updates come in the form of security patches, we’re responsible for making sure those make it into your devices, and that all happens automatically. All of these things are problems that people have solved a million different ways in their own way in building IoT devices, and now we’re trying to provide a platform that allows you to do it all using the Android knowledge that you already have.
The Android Things SDK and the documentation is on the Android dev site. All of our samples are on GitHub. The driver library, and our other samples, are also there. The IoT developers community on G Plus, myself, and the other developer advocates and engineers on the team are hovering around there answering questions, as well as you can share cool things that are going on, and you can see what other developers in the community are doing.
Q & A
Q: The update mechanism is super cool, and that’s one of the hard, hard, parts of doing any IoT thing. You were talking about edge devices, though, and talking about devices that weren’t, perhaps, connected to the network. Is there anything built into Things that allows you to do updates for disconnected edge devices? Dave: absolutely. The question was if you’re not connected to the network, can you still benefit from OTA updates. Android Things doesn’t have anything intrinsically for that, but that it is something we’re working on. Stay tuned for a future preview.
Q: there was a slide about your manifest, and you declare an activity that gets launched when your device gets booted, I guess. In the case of devices that don’t have screens, what happens in activity, do you get like onCreate, do you get the same life cycle, and what type of stuff do you usually do with that? Dave: great question. You’re still using an activity, but what if you don’t have a display? The only thing that changes is inside your activity you never call set contact view with anything. You’re still going to go through the activity life cycle as that activity moves to the foreground. But in this case, foreground doesn’t mean visible on the display, it means in focus of the user. You’re still going to get onCreate, start, and resume. If you wanted to, you could start multiple activities. They would still stack up the same way you would get in Android development today; that might cause your initial activity to pause or stop. Generally, if you look at the samples that we’ve built, we’ve built them as single activity systems and spawning other things out to services or whatever you’d like to do. But the only thing that changes about your activity, is you have no view references and you would never call setContentView. Everything else behaves as you’re already familiar with. Great question.
Q: It would seem to me that one of the big advantages of your candle would be to allow people to decide how bright or how flickery, et cetera, they wanted it to be. Right now, there doesn’t seem to be a mechanism for doing that. And more importantly, there’s nothing that’s tying it to me, Identity wise. But one thing that’s talked about is big advantage of this is being able to tie into Google services. Could you speak for a minute or point to a resource about how to use Android Things with the Google Identity services? Dave: you mentioned like a remote control type application or something where a user from a companion app or something could actually send a command down to the device to configure various things about it, that idea, and associate it with an account. The short answer is that right now there’s no explicit story; you must do this in order for all those things to work, but all of those services are available. Play services is on the device; you can use the Identity service, you can use the authentication APIs to actually access a user’s Google account (and things along those lines). But there’s no direct mechanism for saying you must do it this way. As far as communicating with the device, you could use any number of cloud services. You could use Pub/Sub, you could Firebase, all of these are potential options that we’ve built samples around doing as a way of communicating to the device. And we don’t necessarily have an example of it, but using the Identity or the authentication APIs in Play services, you could tie that to a user’s account; we don’t have an example of doing that yet.
Q: I do embedded Linux stuff a lot right now, I also do Android stuff, so it’s a lot of the stuff that I normally touch. But one of the things that I’m curious about when you’re doing any embedded device is often power management. Is there any power management stuff that you’re borrowing from Android already? Is that like built in? Dave: Yes, absolutely. Android has power management functionality already; we have things like auto sleeping the device, and then wake locks if you need to keep it awake for periods. All of those APIs will eventually function in the same way. Today they’re all disabled, as we’re building the developer preview. But eventually, those APIs will be used in a similar way, and we’ll be able to provide samples around this is running it in the lowest power mode possible, and if you need to keep it in a high power mode for doing something, this is how you would do that. But in general, we’re not planning on adding any new APIs for that functionality. It’s going to be the wake locks and other power management functionality that’s already in Android, once we flip the bit and enable those things. Right now, they’re off. The device is always full power, no sleep.
Q: You mentioned that the updates for Android things, the security updates are automatic. Does this mean that they still need to go through the manufacturer, or is this completely owned by Google? Dave: Good question. So, the short answer is we’re still working out some of the details there. If you were to play around with this today the IoT Developer Console is a thing you can log into, but it doesn’t do anything. All of these pieces around actually uploading your APK, generating an image, and downloading it into the device, are coming in a future preview. All I can really speak to is the way we expect it to work. And in general, right now, the idea is that when it’s a security update, or an update that doesn’t effect the platform version or the API level, that’s something that we could do automatically. We might notify you that it’s being done, but we could, in theory, push that out automatically. Or at least, that’s something you could opt in to allow us to do. Whereas, if it was a new platform version where you might actually have to retest your app against some major change, then that’s something where you would have to upload a new APK, maybe with a new target SDK, and that allows us to do a new build, or something along those lines. A bit of that is speculation right now. But the idea is that from a security updates perspective, we want to be able to update that device in the field even if your company goes out of business. The idea that those security updates can continue to go to the user even if the manufacturer is no longer around to check the box and say, “Yes, go ahead and push,” or, “I don’t have a new update,” to maintain as much security to the user as we can.
Q: You mentioned your current preview, future previews. For those of us that are thinking this is very cool, for those of us thinking about actual productization, and I appreciate this is one of those sensitive questions, is there anything close to a timeframe for production release? Dave: Great question. You’re absolutely right that the answer is I can’t really say for sure. We’ve been in Developer Preview since early December. We’re on Developer Preview 3, which was released last week. The expectation is that in the near term (meaning most likely some time this year), we should be out of preview and into something that we would consider a stable release. But that depends on the features we have yet to develop. If you’ve played around with any of the previews or you start looking at them, you’ll see that things like power management are not yet enabled. We’re still filling in holes in the SDK, beyond adding new features. Depending no how quickly we can do those things in a stable time frame, that could change all of that. But the idea is, we’re hoping to get there, I would say by the end of the year, if we can.


Receive news and updates from Realm straight to your inbox