What is ReactiveX?
ReactiveX (Reactive Extensions) is an open-source library of classes, patterns, and operators that tackles the challenges of asynchronous and event-based programming. (This is pretty much most modern mobile applications.)
ReactiveX is ported to many different platforms - you can use the same concepts and set of operators in RxJava, RxJS, RxPHP, RxSwift, and many others.
Since ReactiveX builds upon two very popular but simple patterns, Iterator and Observer, it is not difficult to understand. Plus, it’s easy to use and reason about, across platforms.
The strength of Rx code is in making asynchronous code (like networking, data processing, etc.) be handled in a synchronous manner, allowing programmers to easily define data and time transformations. For example:
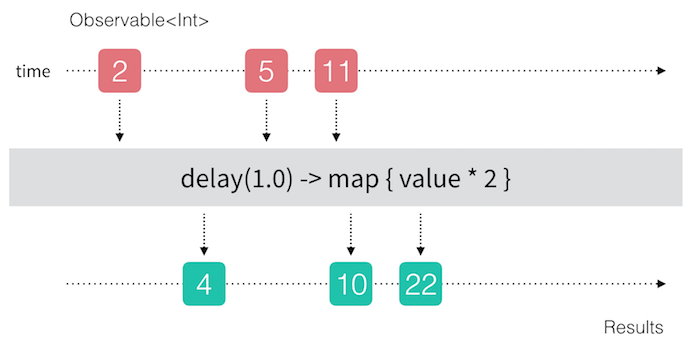
This article is for everyone who is already using RxSwift to develop mobile apps and is looking to use Realm in their reactive code base too.
If you’re not using RxSwift but are interested in learning more, you can head to the ReactiveX website or to the RxSwift GitHub repo.
Getting Started With RxRealm
You can use the RxRealm extension via CocoaPods (simply pod 'RxRealm') or you can grab the current source code from GitHub.
The library is a thin wrapper around the already reactive Realm collections. For example you can easily refresh a table view by subscribing to changes on a Results object, by using asObservable():
let realm = try! Realm()
realm.objects(Lap).asObservable()
  .subscribeNext {[weak self] laps in
    self?.tableView.reloadData()
  }
asObservable() -> Observable<Self> emits a value any time your Results, List, etc., collection changes. Then you can use the emitted value to process the latest collection items.
If you want to make use of Realm’s fine-grained notifications, use asObservableChangeset() instead, which produces an Observable<(Self, RealmChangeset?)>:
realm.objects(Lap).asObservableChangeset()
  .subscribeNext {result, changes in
    if let changes = changes {
      //it's an update
      print("deleted: \(changes.deleted) inserted: \(changes.inserted) updated: \(changes.updated)")
    } else {
      //it's the initial data
      print(result)
    }
  }
Finally, if you want to observe a collection and retain which items were in and their order, use asObservableArray(). This is handy if you want to produce diff sets between emitted values or when you want to use some of the useful methods on Array like so:
realm.objects(Lap).asObservableArray()
  .map {array in
    return array.prefix(3) //slice off the first 3 items
  }
  .subscribeNext { text  in
    ...
  }
Looks interesting? Keep reading for a more complex example, which lets you build a complete app that searches GitHub in few lines with RxSwift, RxCocoa, and RxRealm.
GitHub Search With Rx and Realm
In this post we’re going to look into creating a small app that searches GitHub for repositories that match a given search pattern. The app will use GitHub’s JSON API and fetch the results in JSON format. To showcase the power of Realm + Rx the app will also feature a local cache (bam!).
If you want to dig through the complete app’s source code as you read this post, go ahead and clone the project.
The app will consist of a single view controller where we will put all code. (This is an example app - in your own apps you’d be using a proper architecture, like MVVM or something more interesting.)
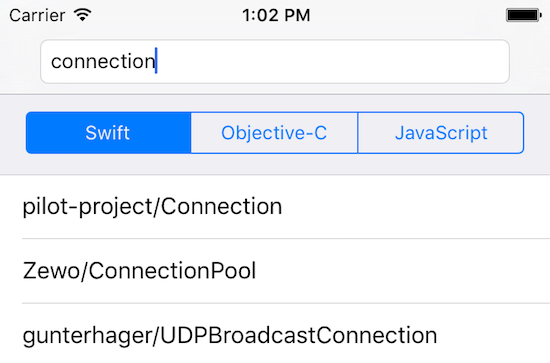
The app will feature a text field to enter a search term, a segmented control to specify a programming language, and a table view to list the search results:
Talking to GitHub’s JSON API
NB: This part of the article assumes you are at least a bit familiar with RxSwift and/or RxCocoa. If you are not already somewhat familiar with those, it would be a good idea to check out the links provided in the intro section.
You are certainly already thinking how to wire the input from the text field and language selector to a network call to the API.
Let’s start easy by combining the text field value and the selected language. We’ll use the bindings the companion library RxCocoa provides:
let input = Observable.combineLatest(
  query.rx_text.filter {$0.utf8.count > 2}, language.rx_selectedTitle)
    {term, language in (term, language!)}
    .shareReplay(1)
We take the latest text entered in the field (only if it’s at least 3 characters long, to save on hits to the network) and the last selected title in the segment control. We combine them into a tuple and prepare to share across subscriptions.
Next let’s subscribe to the input and make a network call to GitHub:
input.throttle(0.5, scheduler: MainScheduler.instance)
  .map(NSURL.gitHubSearch)
  .flatMapLatest { url in
    return NSURLSession.sharedSession().rx_JSON(url)
  }
We throttle the input (again, to save on network calls), build up the proper API url to get the required search results (check the repo for the code of NSURL.gitHubSearch), and finally fire off a network call and get back JSON via rx_JSON(_).
A lot of work for just few lines of code! Let’s see how to convert the fetched JSON to Realm objects next. We’ll just continue adding operators to the last subscription chain:
... // Code from above
  .observeOn(ConcurrentDispatchQueueScheduler(globalConcurrentQueueQOS: .Background))
  .map {json -> [Repo] in
    guard let json = json as? [String: AnyObject],
        items = json["items"] as? [AnyObject] else {return []}

    return items.map {Repo(value: $0)}
  }
We switch to a background dispatch queue and then map the JSON response to a list of Repo Realm objects. For this simple demo we’re using Repo(value: object) and having the convenience init(value:_) on Realm’s Object class to figure out the JSON to Repo mapping.
Note: This code will crash if the JSON doesn’t match the expected properties, so you might want avoid using it like this in production.
Finally we can store the list of Repo objects into Realm. At this point, the code is already running on a background thread (and you’re not changing threads anymore, so you can safely use the Realm objects) and you can simply use subscribeNext() to store the objects:
... // Code from above
  .subscribeNext {repos in
    let realm = try! Realm()
    try! realm.write {
      realm.add(repos, update: true)
    }
  }
  .addDisposableTo(bag)
In that last piece of code we open a Realm from the current thread, add all repo objects in, and finish with adding the subscription to a dispose bag.
Neat! Now we have the subscription that drives the complete sequence: from validating and throttling user input, to making an asynchronous network call, to parsing and converting JSON, and finally to creating Realm objects and storing them on disc.
Next let’s look how to use RxRealm and make use of Realm’s built-in notifications.
Using RxRealm to drive the app UI
Next we’ll make another subscription to the user input, filter the objects stored in Realm, and show the results in the view controller’s table view.
Since we’d like to reuse the code showing the results in the table, we’ll extract it in its own method:
input
  .subscribeNext {[weak self] in
    self?.bindTableView($0, language: $1)
  }
  .addDisposableTo(bag)
Now, any time the user enters a valid search term, that will invoke bindTableView(_, language: _).
But what will happen when the user deletes the search term? Let’s add yet another subscription for that case:
query.rx_text.filter {$0.utf8.count <= 2}
  .subscribeNext {[weak self] _ in
    self?.bindTableView(nil)
  }
  .addDisposableTo(bag)
If the search term is shorter than 3 characters, that will invoke bindTableView(_, language: _) with a nil parameter.
Let’s move onto bindTableView itself!
private var repos: Results<Repo>?

func bindTableView(term: String?, language: String? = nil) {
  resultsBag = DisposeBag()

  guard let term = term, let language = language else {
    repos = nil
    tableView.reloadData()
    return
  }

  ...
If there’s no search term passed to the method, the code resets repos to nil and refreshes the table view (to hide any previous results visible).
Next let’s find the results the user is interested in:
...
  repos = realm.objects(Repo).filter("full_name CONTAINS[c] %@ AND language = %@", term, language)
  ...
And we can subscribe for the changes that happen to that result set:
...
  repos!.asObservableChangeset()
    .subscribeNext {[weak self] repos, changes in
      guard let tableView = self?.tableView else { return }

      ... // Do some table view magic here
    }
    .addDisposableTo(resultsBag)
  ...
Now when the user enters a search term this is what will happen:
- The app will fire a network call to GitHub
- The app will show the current local search results for the search term
- When JSON results come in, they will be merged into the app’s Realm
- The changes to the results will come through in the subscription above, so you can update the table view as well
Neat! The app has local cache so it could work offline as well as online. Plus it shows instant results if there are any cached locally, before it handles the response from the network!
Let’s just add the table view code in that last subscribeNext chunk to refresh the results on screen:
// Table view magic
      if let changes = changes {
        tableView.beginUpdates()
        tableView.insertRowsAtIndexPaths(changes.inserted.map { NSIndexPath(forRow: $0, inSection: 0) },
          withRowAnimation: .Automatic)
        tableView.endUpdates()
      } else {
        tableView.reloadData()
      }
To make the initial local results appear as soon as possible, we call tableView.reloadData(). In contrast, to make the new results that would come in via the network more visible, we use animations for updates.
Note: Since in this demo we are only adding to the local cache, we only take care of changes.inserted. If you also expect object updates or deletions, you should handle changes.updated and changes.deleted. For more examples how to use fine-grained notifications, check out this post.
Time to test the app!
Let’s run the app and search for “animation” and try the “Swift” and “Objective-C” language filters:
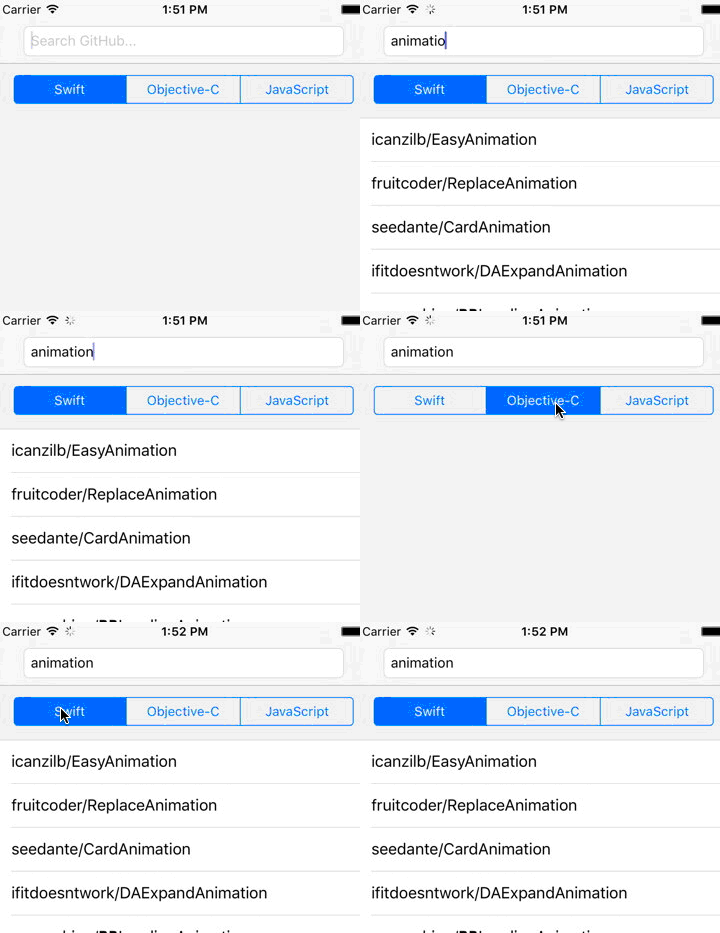
When the user first starts typing, there aren’t any results, but the results “pour in” when the network responds.
Now let’s see if our local vs. network results work. The top result for “animation” was the “EasyAnimation” repo [Ed. note: I’ve heard that’s written by someone super cool!] so let’s try searching for “easy” next:
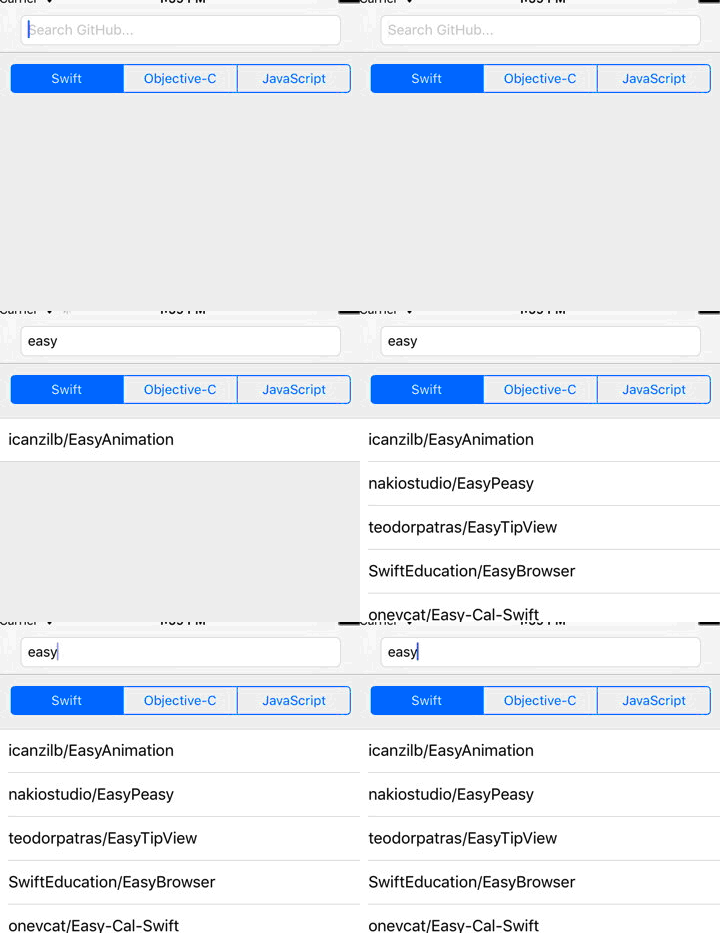
This time around, EasyAnimation comes up instantly as a search result (because it came straight from Realm), and after a bit when the network response comes through, all the other matching repos show up as well.
As a final step in our test you can delete the search term to see if the final subscription we added works and clears the results:
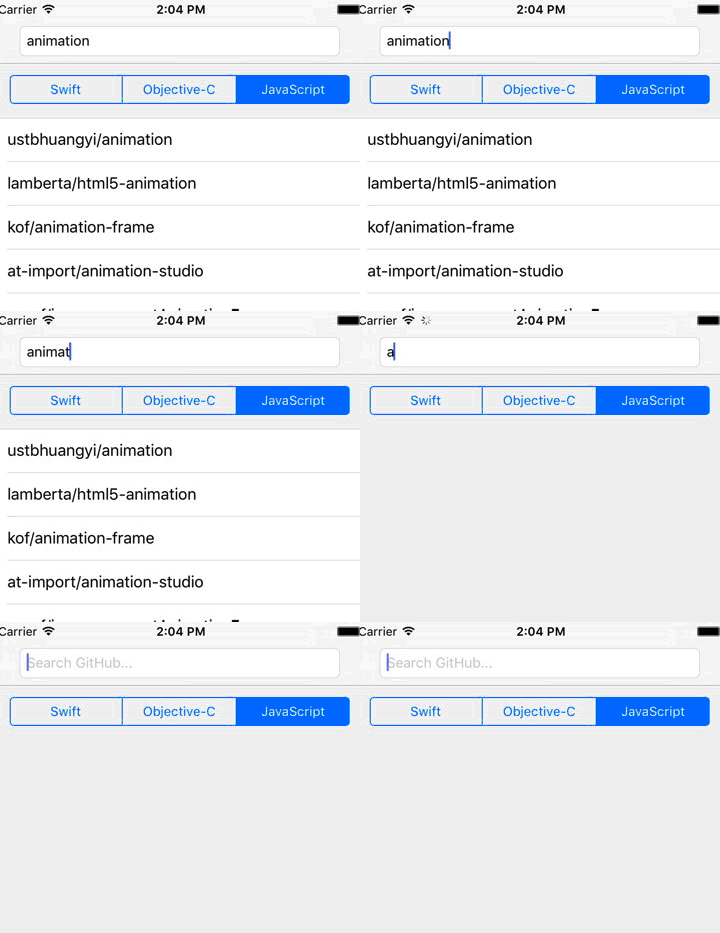
Conclusion
As you saw, using RxRealm in combination with RxSwift allows you to easily fit Realm in your reactive code structure.
Everything we did in this post you could also do without Rx, by using Realm’s built-in notifications, the delegate methods of all the UI elements, and finally the callbacks to work with NSURLSession.
RxSwift simply makes all the asynchronous code read sequentially, helps you avoid the pyramid of doom, and allows you to discuss your code logic with Android- or JavaScript-loving colleagues.
If you want to give the app from this post a test drive, you can clone it.
We’re happy to help integration with any existing technology, so if you’re into RxSwift check out RxRealm on GitHuband show us what you built on Twitter!


Receive news and updates from Realm straight to your inbox